In this post I will show some guidlines to create a Spring web application, running it using Jetty and using an external library called ROME for RSS reading.
General
I have recently created a sample web application that acts as an RSS reader.
I wanted to examine ROME for RSS reading.
I also wanted to create the application using Spring container and MVC for the simplest view.
For rapid development, I used Jetty as the server, using a simple java class for it.
All the code can be found at GitHub, eyalgo/rss-reader.
Content
- Maven Dependencies
- Jetty Server
- Spring Dependency
- Spring MVC
- ROME
Maven Dependencies
At first, I could not get the correct Jetty version to use.
There is one with group-id mortby, and another by eclipse.
After some careful examination and trial and error, I took the eclipse’s library.
Spring is just standard.
I found ROME with newest version under GutHub. It’s still a SNAPSHOT.
Here’s the list of the dependencies:
- Spring
- jetty
- rome and rome-fetcher
- logback and slf4j
- For Testing
- Junit
- mockito
- hamcrest
- spring-test
The project’s pom file can be found at: https://github.com/eyalgo/rss-reader/blob/master/pom.xml
Jetty Server
A few years ago I’ve been working using Wicket framework and got to know Jetty, and its easy usage for creating a server.
I decided to go in that direction and to skip the standard web server running with WAR deployment.
There are several ways to create the Jetty server.
I decided to create the server, using a web application context.
First, create the context:
private WebAppContext createContext() {
  WebAppContext webAppContext = new WebAppContext();
  webAppContext.setContextPath("/");
  webAppContext.setWar(WEB_APP_ROOT);
  return webAppContext;
}
Then, create the server and add the context as handler:
  Server server = new Server(port);
  server.setHandler(webAppContext);
Finally, start the server:
  try {
    server.start();
  } catch (Exception e) {
    LOGGER.error("Failed to start server", e);
    throw new RuntimeException();
  }
Everything is under https://github.com/eyalgo/rss-reader/tree/master/src/test/java/com/eyalgo/rssreader/server
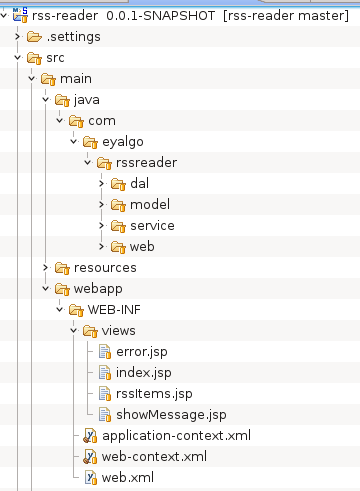
Spring Project Structure
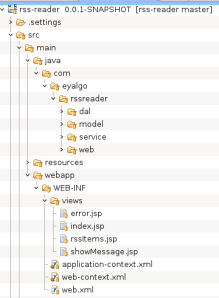
RSS Reader Project Structure
Spring Dependency
In web.xml I am declaring application-context.xml and web-context.xml .
In web-context.xml , I am telling Spring were to scan for components:
<context:component-scan base-package="com.eyalgo.rssreader"/>
In application-context.xml I am adding a bean, which is an external class and therefore I can’t scan it (use annotations):
<bean id="fetcher" class="org.rometools.fetcher.impl.HttpURLFeedFetcher"/>
Besides scanning, I am adding the correct annotation in the correct classes.
@Repository

@Service

@Controller
@Autowired
Spring MVC
In order to have some basic view of the RSS feeds (and atoms), I used a simple MVC and JSP pages.
To create a controller, I needed to add @Controller for the class.
I added @RequestMapping("/rss") so all requests should be prefixed with rss.
Each method has a @RequestMapping declaration. I decided that everything is GET.
Adding a Parameter to the Request
Just add @RequestParam("feedUrl") before the parameter of the method.
Redirecting a Request
After adding an RSS location, I wanted to redirect the answer to show all current RSS items.
So the method for adding an RSS feed needed to return a String.
The returned value is: “redirect:all”.
  @RequestMapping(value = "feed", method = RequestMethod.GET)
  public String addFeed(@RequestParam("feedUrl") String feedUrl) {
    feedReciever.addFeed(feedUrl);
    return "redirect:all";
  }
Return a ModelAndView Class
In Spring MVC, when a method returns a String, the framework looks for a JSP page with that name.
If there is none, then we’ll get an error.
(If you want to return just the String, you can add @ResponseBody to the method.)
In order to use ModelAndView, you need to create one with a name:
ModelAndView modelAndView = new ModelAndView("rssItems");
The name will tell Spring MVC which JSP to refer to.
In this example, it will look for rssItems.jsp.
Then you can add to the ModelAndView “objects”:
  List<FeedItem> items = itemsRetriever.get();
  ModelAndView modelAndView = new ModelAndView("rssItems");
  modelAndView.addObject("items", items);
In the JSP page, you need to refer the names of the objects you added.
And then, you can access their properties.
So in this example, we’ll have the following in rssItems.jsp:
  <c:forEach items="${items}" var="item">
    <div>
      <a href="${item.link}" target="_blank">${item.title}</a><br>
        ${item.publishedDate}
    </div>
  </c:forEach>
Note
Spring “knows” to add jsp as a suffix to the ModelAndView name because I declared it in web-context.xml.
In the bean of class: org.springframework.web.servlet.view.InternalResourceViewResolver.
By setting the prefix this bean also tells Spring were to look for the jsp pages.
Please look:
https://github.com/eyalgo/rss-reader/blob/master/src/main/java/com/eyalgo/rssreader/web/RssController.java
https://github.com/eyalgo/rss-reader/blob/master/src/main/webapp/WEB-INF/views/rssItems.jsp
Error Handling
There are several ways to handle errors in Spring MVC.
I chose a generic way, in which for any error, a general error page will be shown.
First, add @ControllerAdvice to the class you want to handle errors.
Second, create a method per type of exception you want to catch.
You need to annotate the method with @ExceptionHandler. The parameter tells which exception this method will handle.
You can have a method for IllegalArgumentException and another for different exception and so on.
The return value can be anything and it will act as normal controller. That means, having a jsp (for example) with the name of the object the method returns.
In this example, the method catches all exception and activates error.jsp, adding the message to the page.
  @ExceptionHandler(Exception.class)
  public ModelAndView handleAllException(Exception e) {
    ModelAndView model = new ModelAndView("error");
    model.addObject("message", e.getMessage());
    return model;
  }
ROME is an easy to use library for handling RSS feeds.
https://github.com/rometools/rome
rome-fetcher is an additional library that helps getting (fetching) RSS feeds from external sources, such as HTTP, or URL.
https://github.com/rometools/rome-fetcher
As of now, the latest build is 2.0.0-SNAPSHOT
An example on how to read an input RSS XML file can be found at:
https://github.com/eyalgo/rss-reader/blob/master/src/test/java/com/eyalgo/rssreader/runners/MetadataFeedRunner.java
To make life easier, I used rome-fetcher.
It gives you the ability to give a URL (RSS feed) and have all the SyndFeed out of it.
If you want, you can add caching, so it won’t download cached items (items that were already downloaded).
All you need is to create the fetcher with FeedFetcherCache parameter in the constructor.
Usage:
  @Override
  public List<FeedItem> extractItems(String feedUrl) {
    try {
      List<FeedItem> result = Lists.newLinkedList();
      URL url = new URL(feedUrl);
      SyndFeed feed = fetcher.retrieveFeed(url);
      List<SyndEntry> entries = feed.getEntries();
      for (SyndEntry entry : entries) {
        result.add(new FeedItem(entry.getTitle(), entry.getLink(), entry.getPublishedDate()));
      }
      return result;
    } catch (IllegalArgumentException | IOException | FeedException | FetcherException e) {
      throw new RuntimeException("Error getting feed from " + feedUrl, e);
    }
}
https://github.com/eyalgo/rss-reader/blob/master/src/main/java/com/eyalgo/rssreader/service/rome/RomeItemsExtractor.java
Note
If you get a warning message (looks as System.out) that tells that fetcher.properties is missing, just add an empty file under resources (or in the root of the classpath).
Summary
This post covered several topics.
You can also have a look at the way a lot of the code is tested.
Check Matchers and mocks.
If you have any remarks, please drop a note.
Eyal