It’s All About Tests – Part 3

In the previous two posts I discussed mostly about the philosophy and attitude of developing with testing.
In this post I give some tips and tools examples for testing.

Tools

JUnit
http://junit.org/
There’s also TestNG, which is great tool. But I have much more experience with JUnit so I will describe this framework.
1. Use the latest version.
2. Know your testing tool!

  • @RunWith
    This is class annotation. It tells JUnit to run with different Runner (mockito and Spring runners are the most common runners I use)

    import org.mockito.runners.MockitoJUnitRunner;
    ...
    @RunWith(MockitoJUnitRunner.class)
    public class MyClassTest {
      ...
    }
    
    @RunWith(SpringJUnit4ClassRunner.class)
    @ContextConfiguration(locations = { "/META-INF/app-context.xml","classpath:anotherContext.xml" })
    public class MyClassTest {
      ...
    }
    // You can inherit AbstractJUnit4SpringContextTests instead of using runner
    
  • @Rule
    kind of AOP.
    The most common out-of-the-box rule, is the TemporaryFolder Rule. It lets you use the file system without worrying about opening and closing files.
    An example of Rules can be found here.
  • Parameterized runner
    Really cool tool. It lets you run the same test with different input and different expected output.
    It might be abused and make a atest unreadable.
  • Test Data Preparation and Maintenance Tips

hamcrest
http://hamcrest.org/JavaHamcrest/
This library is “extension” of JUnit.
I can’t work without it 🙂
Hamcrest library gives us out-of-the-box matchers.
Matchers are used with the assertThat(...,Matcher) flavor.
I almost always use this flavor.
(In the previous post, someone suggested that I shouldn’t use assertTrue(…), but instead use assertThat.)

There are plenty type of matchers:
You can verify existing objects in collection ignoring order.
You can check greater than.
The test is more readable using the assertThat + matcher.

assertThat(mapAsCache.containsKey(new CacheKey("valA", "valB")), is(true));
assertThat(cachPairs.size(), is(2));
assertThat(enity.getSomething(), nullValue(Double.class));
assertThat(event.getType(), equalTo(Type.SHOWN));
assertThat(bits, containsInAnyOrder(longsFromUsIndexOne, longsFromUsIndexZero));

You can create your own Matcher. It’s very easy.
Here’s an example of matchers that verify Regular Expressions. https://github.com/eyalgo/junit-additions

mockito
https://code.google.com/p/mockito/
This is the second library I can’t work without.
It lets you mock dependencies of the class under test.

Using mockito you mock dependency.
Then you “tell” the mock object how to behave in certain inputs.
You tell it what to return if some input entered.
You can verify input arguments to a called method.
You can verify that a certain method was called (once, never, 3 times, etc.)
You can check the order of method / mocks calls.

Check this out:

package eyalgo;
import static org.hamcrest.Matchers.equalTo;
import static org.mockito.Matchers.anyString;
import static org.mockito.Matchers.argThat;
import static org.mockito.Mockito.inOrder;
import static org.mockito.Mockito.mock;
import static org.mockito.Mockito.never;
import static org.mockito.Mockito.times;
import static org.mockito.Mockito.verify;
import static org.mockito.Mockito.verifyNoMoreInteractions;
import static org.mockito.Mockito.verifyZeroInteractions;
import static org.mockito.Mockito.when;
import org.junit.Before;
import org.junit.Test;
import org.junit.runner.RunWith;
import org.mockito.InOrder;
import org.mockito.InjectMocks;
import org.mockito.Mock;
import org.mockito.MockitoAnnotations;
import org.mockito.invocation.InvocationOnMock;
import org.mockito.runners.MockitoJUnitRunner;
import org.mockito.stubbing.Answer;
//The RunWith automatically instantiate fields with @Mock annotation
//and injects to the tested class @InjectMocks
@RunWith(MockitoJUnitRunner.class)
public class NameConnectorTest {
@Mock
private NameConvention nameConventionAsMockField;
@InjectMocks
private NameConnector connector;
private NameConvention nameConventionAsMockOther;
@Before
public void setup() {
//This is another way to inject mocks (instead of the annotations above)
MockitoAnnotations.initMocks(this);
nameConventionAsMockOther = mock(NameConvention.class);
NameConnector otherConnector = new NameConnector(nameConventionAsMockOther);
}
@Test
public void showSomeMockitoExamples() {
NameConvention nameConventionAsMock = mock(NameConvention.class, "Name for this mock");
// Stub and tell your mock to do something
when(nameConventionAsMock.bigBangConvention("INPUT")).thenReturn("Some output");
// Throw exception for some input
when(nameConventionAsMock.bigBangConvention("Other INPUT")).thenThrow(new RuntimeException("oops"));
// Do more complicated stuff in the "when"
Answer<String> answer = new Answer<String>() {
@Override
public String answer(InvocationOnMock invocation) throws Throwable {
//do something really complicated
return "some output";
}
};
//Show also hamcrest matchers
when(nameConventionAsMock.bigBangConvention(argThat(equalTo("my name is Inigo Montoya")))).then(answer);
// Run the test..
//Verify some calls
verify(nameConventionAsMock).bigBangConvention("INPUT");
verify(nameConventionAsMock, times(10)).bigBangConvention("wow");
// Verify that the method was never called. With any input
verify(nameConventionAsMock, never()).bigBangConvention(anyString());
verifyNoMoreInteractions(nameConventionAsMock);
verifyZeroInteractions(nameConventionAsMockField);
//Check order of calls
InOrder order = inOrder(nameConventionAsMock, nameConventionAsMockOther);
order.verify(nameConventionAsMock).bigBangConvention("INPUT");
order.verify(nameConventionAsMock).bigBangConvention("other INPUT");
}
}

Other Mocking Tools

  • PowerMock and EasyMock
    These two are very useful when working with legacy code.
    They allow you to test private methods, static methods and more things that you normally can’t.
    I think that if you need them, then something is wrong with the design.
    However, sometimes you use external libraries with singletons and/or static methods.
    Sometimes you work on legacy code, which is not well suited for testing.
    On these types of scenarios, then those mocking libraries can help
    https://code.google.com/p/powermock/
    http://easymock.org/
  • JMockit http://jmockit.github.io/
  • jMock http://jmock.org/

JBehave
http://jbehave.org/
JUnit, mockito, hamcrest are used for unit tests.
JBehave is not exactly the same.
It is a tool for Behavior-Driven-Development (BDD)
You write stories which are backed up by code (Java) and then you run them.

JBehave can be used for higher level tests, like functional tests.
Using JBehave, it’s easier to test a flow in the system.
It follows the Given, When, Then sequence.

If you take it to the next step, it can be a great tool for communication.
The product owner can write the scenarios, and if all is green, by the end of the iteration, then we passed the definition of done.

cucumber is another BDD tool.

Dependency Injection
In order to have testable code, among other things, you need to practice DI (dependency injection).
The reason is simple:
If you instantiate a dependency in a constructor (or method) of a class under test, then how can you mock it?
If you can’t mock the dependency, then you are bound to it. And you can’t simulate different cases.

Many application have Spring as the DI container, but less developers take the advantage of using the injection for testing.

Metrics
Use SONAR in your CI environment.
Check code coverage using cobertura or other tools.
Use Jenkins / Hudson / Other CI tool for automation.

IDE
Your IDE can help you writing tests.
For eclipse, I have two recommendations:

  1. MoreUnit is cool plugin that helps writing tests faster.
  2. In eclipse, CTRL+Space can give you hints and fill imports. But not static imports.
    Most (all?) libraries use static imports.
    So you can add the testing libraries as favorites and then eclipse will fill them for you.
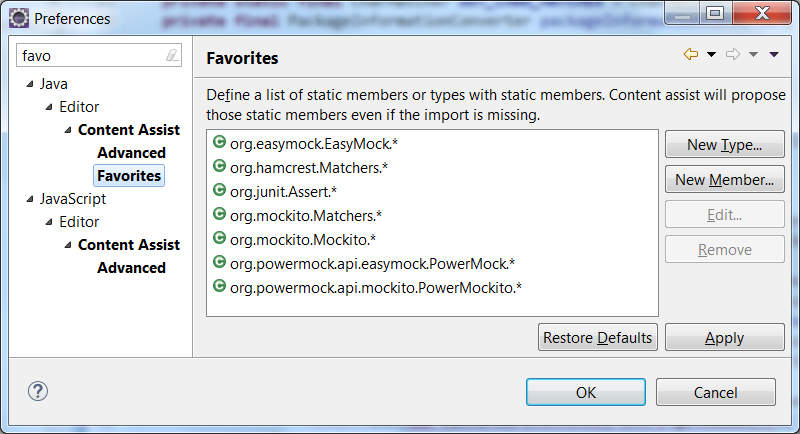
  3. eclipse favorites

    eclipse favorites

POM
Here’s part of POM for testing libraries.

<build>
<plugins>
<plugin>
<groupId>org.apache.maven.plugins</groupId>
<artifactId>maven-compiler-plugin</artifactId>
<configuration>
<source>1.8</source>
<target>1.8</target>
</configuration>
</plugin>
<plugin>
<groupId>org.apache.maven.plugins</groupId>
<artifactId>maven-jar-plugin</artifactId>
<configuration>
<archive>
<addMavenDescriptor>false</addMavenDescriptor>
</archive>
</configuration>
</plugin>
<plugin>
<groupId>org.apache.maven.plugins</groupId>
<artifactId>maven-source-plugin</artifactId>
<executions>
<execution>
<goals>
<goal>jar-no-fork</goal>
</goals>
</execution>
</executions>
</plugin>
<plugin>
<artifactId>maven-assembly-plugin</artifactId>
<configuration>
<archive>
<manifest>
<mainClass>com.startapp.CouchRunner.GetUserProfile</mainClass>
</manifest>
</archive>
<descriptorRefs>
<descriptorRef>jar-with-dependencies</descriptorRef>
</descriptorRefs>
</configuration>
</plugin>
</plugins>
</build>
view raw pom.xml hosted with ❤ by GitHub

You can use profiles to separate unit testing with integration tests.

Linkedin Twitter facebook github

It’s All About Tests – Part 2

This is the second post of the series about testing.
In the first part I explained about the mindset we need to have while developing with tests. Or, in better words, developing for testable code.
In this part I will cover some techniques for testing approach.
The techniques I will describe can be seen as how to transform the mindset into actions.

Techniques

Types Of Tests
Types of tests are layers of what we test.

The most obvious one is the unit test.
Using JUnit (or TestNG, or any other tool), you will test the behavior of your code.
Each test should check one behavior of the class/method under test.

Another layer of tests, which usually done by developers, is what I like to call integration tests.
This type of test will usually be part of the code (under the test directory).

Integration tests may test several classes together.
They may test partial flow.

I like to test Spring wiring, verifying that the context file is correct. For example, if I have injected list of beans and the order is important.
Testing the wiring can be considered as integration test.
Another example would be checking the integration of a DAO class and the class that uses it. Sometimes there are “surprises” in these parts.

As a higher degree of tests, you will want to test request and response (REST).
If you have GUI, make an automated test suit for that as well.

Automation
Automate your full development cycle.
Use CI service, such as Hudson/Jenkins
Add your JUnit, selenium, JMeter, JBehave to your CI environment.

I suggest the following:
1. CI that checks the SCM for changes and runs whenever there is a change.
2. Nightly (or every few hours). A slower automation test suit that check more stuff, like integration tests.
The nightly can be slower.
If you do continuous deployment, then your setup may be different.

Environment
Have dedicated environment for testing.
DB that can be cleared and refilled.
If you work on REST service, have a server just for your test and automation environment.
If you can, try making it as similar as possible to production environment.

Stub, Mock
There are frameworks for stubbing and mocking.
But first understand what it means.
There’s a slight difference between stubbing and mocking.
Basically they both fake a real object (or interface).
You can tell the fake object to behave as you want in certain input.
You could also verify that it was called with expected parameters.
(more about it in next post)

Usage of External Resources
You can fake DB, or you can use some kind of embedded database.
Embedded database helps you isolate tests that include DB.
Same thing for external services.

Descriptive Tests

  • Add the message parameter.
    assertTrue("Cache pairs is not size 2", cachPairs.size() == 2);
    

    It has at least two benefits:
    1. The test is more readable
    2. When it fails, the message is clearer

    How many times you couldn’t tell what went wrong because there was no message? The failing test was assertTrue(something), Without the message parameter.

  • Name you tests descriptively.
    Don’t be afraid to have test-methods with (very) long name.
    It really helps when the test fails.
    Don’t name a test something like: public void testFlow(){...}
    It doesn’t mean anything.
  • Have naming convention.
    I like to name my tests: public void whenSomeInput_ThenSomeOutput() {...}
    But whatever you like to name your tests, try to follow some convention for all tests.

Test Structure
Try to follow the:
Given, When, Then sequence.
Given is the part where you create the test environment (create embedded DB, set certain values etc.)
It is also the part where you tell your mocks (more about it next post) how to behave.
When is the part where you run the tested code.
Then is where you check the result using assertions.
It’s the part where you verify that methods were called. Or not.

If it’s hard to keep an orderly structure, then consider it as test-smell (see previous post).

Unit Tests Should Run Fast
A unit test of class should run 1-5 seconds. Not more.
You want the quickest feedback whether something failed.
You will also want to run the unit tests as many times as possible.
If a test for one class takes around 30-60 seconds, then usually we won’t run it.

Running a full test suit on all your project should not take more than a few minutes (more than 5 is too much).

Coverage
Tests should coverage all your production code.
Coverage helps spot code which is not tested.
If it’s hard to cover some code, for instance due to many code branches (if-else), then again, you have test smell.
If you practice TDD, then you automatically have very high coverage.

Important: Do not make code coverage as the goal.
Code coverage is a tool. Use it.

TDD
Allow me not to add anything here…

Conclusion
In this post I gave some more ways, more concrete, on how to approach development with tests.
In the following post I will give some pointers and tips on how to work with the available tools.

Linkedin Twitter facebook github

It’s All About Tests – Part 1

This post is the first of a series of three.
1. Mindset of testing
2. Techniques
3. Tools and Tips

The Mindset

Testing code is something that needs to be learned. It takes time to absorb how to do it well.
It’s a craft that one should always practice and improve.

Back in the old days, developers did not test, they checked their code.
Here’s a nice twit about it:

Today we have many tools and techniques to work with.
XUnit frameworks, mock frameworks, UI automation, TDD, XP…

But I believe that testing starts with the mind. State of mind.

Why Testing
Should I really answer that?
Tests are your code harness and security for quality.
Tests tell the story of your code. They prove that something works.
They give immediate feedback if something went wrong.
Working with tests correctly makes you more efficient and effective.
You debug less and probably have less bugs, therefore you have more time to do actual work.
Your design will be better (more about it later) and maintainable.
You feel confident changing your code (refactor). More about it later.
It reduces stress, as you are more confident with your code.

What to Test
I say everything.
Perhaps you will skip the lowest parts of your system. The parts that reads/writes to the file system or the DB or communicate some external service.
But even these parts can be tested. And they should.
In following blogs I will describe some techniques how to do that.

Test even the smallest thing. For example, if you have a DTO and you decide that a certain field will be initialized with some value, then make a test that only instantiate this class and then verify (assert) the expected value.
(and yes, I know, some parts really cannot be tested. but they should remain minimal)

SRP
Single Responsibility Principle
This is how I like to refer to the point that a test needs to check one thing.
If it’s a unit test, then it should test one behavior of your method / class.
Different behavior should be tested in a different test.
If it’s a higher level of test (integration, functional, UI), then the same principle applies.
Test one flow of the system.
Test a click.
Test adding elements to DB correctly, but not deleting in the same test.

Isolation
Isolated test helps us understand exactly what went wrong.
Developing isolated test helps us concentrate on one problem at a time.

One aspect of isolation is related to the SRP. When you test something, isolate the tested code from other part (dependencies).
That way you test only that part of the code.
If the test fails, you know were it was.
If you have many dependencies in the test, it is much harder to understand what the actual cause of failure was.

But isolation means other things as well.
It means that no test would interfere another.
It means that the running order of the tests doesn’t matter.
For a unit test, it means that you don’t need a DB running (or internet connection for that matter).
It means that you can run your tests concurrently without one interfere the other (maven allows exactly this).
If you can’t do it (example: DB issues), then your tests are not isolated.

Test Smells
When the test is too hard to understand / maintain, don’t get mad on it 🙂
Say

thank you very much, my dear test, for helping me improve the code

If it is too complicated to setup environment for the test, then probably the unit being tested has too many dependencies.

If after running a method under test, you need to verify many aspects (verify, assert, etc.), the method probably does too much.
The test can be your best friend for code improvement

Usually a really complicated test code means less structured production code.
I usually see correlation between complicated test and code that doesn’t follow the SRP, or any other DOLID principles.

Testable Code
This is one of my favorites.
Whenever I do code review I ask the other person: “How are you going to test it?”, “How do you know it works?”
Whenever I code, I ask myself the same question. “How can I test this piece of code?”

In my experience, thinking always on how to create testable code, yields much better design.
The code “magically” has more patterns, less duplication, better OOD and behaves SOLIDly.

Forcing yourself to constantly test your code, makes you think.
It helps divide big, complicated problem into many (or few) smaller, more trivial ones.

If your code is testable and tested, you have more confident on it.
Confident on the behavior and confident to change it. Refactor it.

Refactoring
This item can be part of the why.
It can be also part of the techniques.
But I decided to give it special attention.
Refactoring is part of the TDD cycle (but not only).
When you have tests, you can be confident doing refactoring.
I think that you need to “think about refactoring” while developing. Similar to “think how to produce testable code”.
When thinking refactoring, testing comes along.

Refactoring is also state of mind. Ask yourself: “Is the code I produced clean enough? Can I improve it?”
(BTW, know when to stop…)

This was the first post of a series of posts about testing.
The following post will be about some techniques and approaches for testing.

Linkedin Twitter facebook github

JUnit Rules

Introduction
In this post I would like to show an example of how to use JUnit Rule to make testing easier.

Recently I inherited a rather complex system, which not everything is tested. And even the tested code is complex.
Mostly I see lack of test isolation.
(I will write a different blog about working with Legacy Code).

One of the test (and code) I am fixing actually tests several components together.
It also connect to the DB. It tests some logic and intersection between components.
When the code did not compile in a totally different location, the test could not run because it loaded all Spring context.
The structure was that before testing (any class) all Spring context was initiated.
The tests extend BaseTest, which loads all Spring context.

BaseTest also cleans the DB in the @After method.

Important note: This article is about changing tests, which are not structured entirely correct.
When creating new code and tests they should be isolated, testi one thing etc.
Better tests should use mock DB / dependencies etc.
After I fix the test and refactor, I’ll have confidence making more changes.

Back to our topic…
So, what I got is slow run of the test suit, no isolation and even problem running tests due to unrelated problems.

So I decided separating the context loading with DB connection and both of them from the cleaning up of the database.

Approach
In order to achieve that I did three things:
The first was to change inheritance of the test class.
It stopped inheriting BaseTest.
Instead it inherits AbstractJUnit4SpringContextTests
Now I can create my own context per test and not load everything.

Now I needed two rules, a @ClassRule and @Rule
@ClassRule will be responsible for DB connection
@Rule will cleanup the DB after / before each test

But first, what are JUnit Rules?
A short explanation would be that they provide a possibility to intercept test method, similar to AOP concept.
@Rule allows us to intercept method before and after the actual run of the method.
@ClassRule intercepts test class run.
A very known @Rule is JUnit’s TemporaryFolder.

(Similar to @Before, @After and @BeforeClass).

Creating @Rule
The easy part was to create a Rule that cleanup the DB before and after a test method.
You need to implement TestRule, which has one method: Statement apply(Statement base, Description description);
You can do a-lot with it.
I found out that usually I will have an inner class that extends Statement.
The rule I created did not create the DB connection, but got it in the constructor.

Here’s the full code:

public class DbCleanupRule implements TestRule {
private final DbConnectionManager connection;
public DbCleanupRule(DbConnectionManager connection) {
this.connection = connection;
}
@Override
public Statement apply(Statement base, Description description) {
return new DbCleanupStatement(base, connection);
}
private static final class DbCleanupStatement extends Statement {
private final Statement base;
private final DbConnectionManager connection;
private DbCleanupStatement(Statement base, DbConnectionManager connection) {
this.base = base;
this.connection = connection;
}
@Override
public void evaluate() throws Throwable {
try {
cleanDb();
base.evaluate();
} finally {
cleanDb();
}
}
private void cleanDb() {
connection.doTheCleanup();
}
}
}

Creating @ClassRule
ClassRule is actually also TestRule.
The only difference from Rule is how we use it in our test code.
I’ll show it below.

The challenge in creating this rule was that I wanted to use Spring context to get the correct connection.
Here’s the code:
(ExternalResource is TestRule)

public class DbConnectionRule extends ExternalResource {
private DbConnectionManager connection;
public DbConnectionRule() {
}
@Override
protected void before() throws Throwable {
ClassPathXmlApplicationContext ctx = null;
try {
ctx = new ClassPathXmlApplicationContext("/META-INF/my-db-connection-TEST-ctx.xml");
mongoDb = (DbConnectionManager) ctx.getBean("myDbConnection");
} finally {
if (ctx != null) {
ctx.close();
}
}
}
@Override
protected void after() {
}
public DbConnectionManager getDbConnecttion() {
return connection;
}
}

(Did you see that I could make DbCleanupRule inherit ExternalResource?)

Using it
The last part is how we use the rules.
A @Rule must be public field.
A @ClassRule must be public static field.

And there it is:

@ContextConfiguration(locations = { "/META-INF/one-dao-TEST-ctx.xml", "/META-INF/two-TEST-ctx.xml" })
public class ExampleDaoTest extends AbstractJUnit4SpringContextTests {
@ClassRule
public static DbCleanupRule connectionRule = new DbCleanupRule ();
@Rule
public DbCleanupRule dbCleanupRule = new DbCleanupRule(connectionRule.getDbConnecttion());
@Autowired
private ExampleDao classToTest;
@Test
public void foo() {
}
}

That’s all.
Hope it helps.

Eyal

[Edit]
I got some good remarks from Logan Mzz at DZone: http://java.dzone.com/articles/junit-rules#comment-125673

  1. Link to Junit Rules: https://github.com/junit-team/junit/wiki/Rules
  2. There’s ErrorCollector rule, which avoids annoying test-fail-fix cycles for a single test.
  3. And RuleChain, which described in the comment

Linkedin Twitter facebook github

Using Reflection for Testing

I am working on a presentation about the ‘Single Responsibility Principle’, based on my previous post.
It take most of my time.

In the meantime, I want to share a sample code of how I use to test inner fields in my classes.
I am doing it for a special case of testing, which is more of an integration test.
In the standard unit testing of the dependent class, I am using mocks of the dependencies.

The Facts

  1. All of the fields (and dependencies in our classes are private
  2. The class do not have getters for its dependencies
  3. We wire things up using Spring (XML context)
  4. I wan to verify that dependency interface A is wired correctly to dependent class B

One approach would be to wire everything and then run some kind of integration test of the logic.
I don’t want to do this. It will make the test hard to maintain.

The other approach is to check wiring directly.
And for that I am using reflection.

Below is a sample code of the testing method, and the usage.
Notice how I am catching the exception and throws a RuntimeException in case there is a problem.
This way, I have cleaner tested code.


// Somewhere in a different utility class for testing
@SuppressWarnings("unchecked")
public static <T> T realObjectFromField(Class<?> clazz, String fieldName, Object object) {
Field declaredField = accessibleField(clazz, fieldName);
try {
return (T) declaredField.get(object);
} catch (IllegalArgumentException | IllegalAccessException e) {
throw new RuntimeException(e);
}
}
private static Field accessibleField(Class<?> clazz, String fieldName) {
try {
Field declaredField = clazz.getDeclaredField(fieldName);
declaredField.setAccessible(true);
return declaredField;
} catch (NoSuchFieldException | SecurityException e) {
throw new RuntimeException(e);
}
}
// This is how we use it in a test method
import static mypackage.ReflectionUtils.realObjectFromField;
ItemFiltersMapperByFlag mapper = realObjectFromField(ItemsFilterExecutor.class, "filtersMapper", filterExecutor);
assertNotNull("mapper is null. Check wiring", mapper);

Request Validation and Filtering by Flags – Filtering an Item

On a previous post, I introduced a system requirement of validating and filtering a request by setting flags on it.

Reference: Introduction

In this post I want to show the filtering system.

Here are general UML diagrams of the filtering components and sequence.

Filtering UML Diagram

General Components

public interface Item {
        String getName();
}
public interface Request {
        Set getFlags();
        List getItems();
}

Filter Mechanism (as described in the UML above)

public interface Filter extends Predicate {
	String errorMessage();
}

FilterEngine is a cool part, which takes several Filters and apply to each the items. Below you can see the code of it. Above, the sequence diagram shows how it’s done.

public class FiltersEngine {

	public FiltersEngine() {
	}

	public ItemsFilterResponse applyFilters(List filters, List items) {
		List validItems = Lists.newLinkedList(items);
		List invalidItemInformations = Lists.newLinkedList();
		for (Filter validator : filters) {
			ItemsFilterResponse responseFromFilter = responseFromFilter(validItems, validator);
			validItems = responseFromFilter.getValidItems();
			invalidItemInformations.addAll(responseFromFilter.getInvalidItemsInformations());
		}

		return new ItemsFilterResponse(validItems, invalidItemInformations);
	}

	private ItemsFilterResponse responseFromFilter(List items, Filter filter) {
		List validItems = Lists.newLinkedList();
		List invalidItemInformations = Lists.newLinkedList();
		for (Item item : items) {
			if (filter.apply(item)) {
				validItems.add(item);
			} else {
				invalidItemInformations.add(new InvalidItemInformation(item, filter.errorMessage()));
			}
		}
		return new ItemsFilterResponse(validItems, invalidItemInformations);
	}
}

And of course, we need to test it:

@RunWith(MockitoJUnitRunner.class)
public class FiltersEngineTest {
	private final static String MESSAGE_FOR_FILTER_1 = "FILTER - 1 - ERROR";
	private final static String MESSAGE_FOR_Filter_2 = "FILTER - 2 - ERROR";
	@Mock(name = "filter 1")
	private Filter singleFilter1;
	@Mock(name = "filter 2")
	private Filter singleFilter2;
	@Mock(name = "item 1")
	private Item item1;
	@Mock(name = "item 2")
	private Item item2;

	@InjectMocks
	private FiltersEngine filtersEngine;

	@Before
	public void setup() {
		when(singleFilter1.errorMessage()).thenReturn(MESSAGE_FOR_FILTER_1);
		when(singleFilter2.errorMessage()).thenReturn(MESSAGE_FOR_Filter_2);

		when(item1.getName()).thenReturn("name1");

		when(item2.getName()).thenReturn("name2");
	}

	@Test
	public void verifyThatAllSingleFiltersAreCalledForValidItems() {
		when(singleFilter1.apply(item1)).thenReturn(true);
		when(singleFilter1.apply(item2)).thenReturn(true);
		when(singleFilter2.apply(item1)).thenReturn(true);
		when(singleFilter2.apply(item2)).thenReturn(true);

		ItemsFilterResponse response = filtersEngine.applyFilters(Lists.newArrayList(singleFilter1, singleFilter2),
				Lists.newArrayList(item1, item2));
		assertThat("expected no invalid", response.getInvalidItemsInformations(),
				emptyCollectionOf(InvalidItemInformation.class));
		assertThat(response.getValidItems(), containsInAnyOrder(item1, item2));

		verify(singleFilter1).apply(item1);
		verify(singleFilter1).apply(item2);
		verify(singleFilter2).apply(item1);
		verify(singleFilter2).apply(item2);
		verifyNoMoreInteractions(singleFilter1, singleFilter2);
	}

	@SuppressWarnings("unchecked")
	@Test
	public void itemsFailIndifferentFiltersShouldGetOnlyFailures() {
		when(singleFilter1.apply(item1)).thenReturn(false);
		when(singleFilter1.apply(item2)).thenReturn(true);
		when(singleFilter2.apply(item2)).thenReturn(false);

		ItemsFilterResponse response = filtersEngine.applyFilters(Lists.newArrayList(singleFilter1, singleFilter2),
				Lists.newArrayList(item1, item2));
		assertThat(
				response.getInvalidItemsInformations(),
				containsInAnyOrder(matchInvalidInformation(new InvalidItemInformation(item1, MESSAGE_FOR_FILTER_1)),
						matchInvalidInformation(new InvalidItemInformation(item2, MESSAGE_FOR_Filter_2))));
		assertThat(response.getValidItems(), emptyCollectionOf(Item.class));

		verify(singleFilter1).apply(item1);
		verify(singleFilter1).apply(item2);
		verify(singleFilter1).errorMessage();
		verify(singleFilter2).apply(item2);
		verify(singleFilter2).errorMessage();
		verifyNoMoreInteractions(singleFilter1, singleFilter2);
	}

	@Test
	public void firstItemFailSecondItemSuccessShouldGetOneItemInEachList() {
		when(singleFilter1.apply(item1)).thenReturn(true);
		when(singleFilter1.apply(item2)).thenReturn(true);
		when(singleFilter2.apply(item1)).thenReturn(false);
		when(singleFilter2.apply(item2)).thenReturn(true);

		ItemsFilterResponse response = filtersEngine.applyFilters(Lists.newArrayList(singleFilter1, singleFilter2),
				Lists.newArrayList(item1, item2));
		assertThat(response.getInvalidItemsInformations(), contains(matchInvalidInformation(new InvalidItemInformation(item1,
				MESSAGE_FOR_Filter_2))));
		assertThat(response.getValidItems(), containsInAnyOrder(item2));

		verify(singleFilter1).apply(item1);
		verify(singleFilter1).apply(item2);
		verify(singleFilter2).apply(item1);
		verify(singleFilter2).apply(item2);
		verify(singleFilter2).errorMessage();
		verifyNoMoreInteractions(singleFilter1, singleFilter2);
	}

	private static BaseMatcher matchInvalidInformation(InvalidItemInformation expected) {
		return new InvalidItemInformationMatcher(expected);
	}

	private final static class InvalidItemInformationMatcher extends BaseMatcher {
		private InvalidItemInformation expected;

		private InvalidItemInformationMatcher(InvalidItemInformation expected) {
			this.expected = expected;
		}

		public boolean matches(Object itemInformation) {
			InvalidItemInformation actual = (InvalidItemInformation) itemInformation;
			return actual.getName().equals(expected.getName())
					&& actual.getErrorMessage().equals(expected.getErrorMessage());
		}

		public void describeTo(Description description) {
		}
	}
}

Some explanation about the test
You can see that I don’t care about the implementation of Filter. Actually, I don’t even have any implementation of it.
I also don’t have implementation of the Item nor the request.
You can see an example of how to create a BaseMatcher to be used with assertThat(…)

Coding
Try to see whether it is ‘clean’. Can you understand the story of the code? Can you tell what the code does by reading it line by line?

On the following post I will show how I applied the flag mapping to select the correct filters for a request.

You can find all the code in: https://github.com/eyalgo/request-validation

[Edit] Created tag Filtering_an_item before refactoring.

Request Validation and Filtering by Flags – Introduction

General

We are working on a service that should accept some kind of request.

The request has List of Items. In the response we need to tell the client whether the request is valid and also some information about each item: is it valid or not. If it’s valid, it will be persisted. If it’s not, it should be filtered out. So the response can have information of how many items are valid (and sent to be persisted) and list of information of the filtered out items.

The request has another metadata in it. It has collection (set) of flags. The filtering and validation is based on the flags of the request. So basically one request may be validated and filtered differently than the other, based on the flags of each request.

We might have general validations / filters that need to be applied to any request, whatever flags it has.

Request Validation and Filtering High level design

Design

Flags Mapping

We’ll hold a mapping of flag-to-filters, and flag-to-validation.

Request

Has flags and items.

Components

Filter, Filter-Engine, Flags-Mapper

Development Approach

Bottom Up

We have a basic request already, as the service is up and running, but we don’t have any infrastructure for flags, flag-mapping, validation and filtering.

We’ll work bottom up; create the mechanism for filtering, enhance the request and then wire it up using Spring.

Coding

I’ll try to show the code using tests, and the development using some kind of TDD approach.

I am using eclipse’s EclEmma for coverage.

General

By looking at the code, you can see usage of JUnit, Mockito, Hamcrest, Google-Guava.

You can also see small classes, and interface development approach.

Source Code

https://github.com/eyalgo/request-validation