Introduction
I created a small project using Dropwizard, MongoDB and Gradle.
It actually started as an experimenting Guava cache as buffer for sending counters to MongoDB (or any other DB).
I wanted to try Gradle with MongoDB plugin as well.
Next, I wanted to create some kind of interface to check this framework and I decided to try out DropWizard.
And this is how this project was created.
This post is not a tutorial of using any of the chosen technologies.
It is a small showcase, which I did as an experimentation.
I guess there are some flaws and maybe I am not using all “best practices”.
However, I do believe that the project, with the help of this post, can be a good starting point for the different technologies I used.
I also tried to show some design choices, which help achieving SRP, decoupling, cohesion etc.
I decided to begin the post with the use-case description and how I implemented it.
After that, I will explain what I did with Gradle, MongoDB (and embedded) and Dropwizard.
Before I begin, here’s the source code:
https://github.com/eyalgo/CountersBuffering
The Use-Case: Counters With Buffer
We have some input requests into our servers.
During the process of a request, we choose to “paint” it with some data (decided by some logic).
Some requests will be painted by Value-1, some by Value-2, etc. Some will not be painted at all.
We want to limit the number of painted requests (per paint value).
In order to have limit, for each paint-value, we know the maximum, but also need to count (per paint value) the number of painted requests.
As the system has several servers, the counters should be shared by all servers.
The latency is crucial. Normally we get 4-5 milliseconds per request processing (for all the flow. Not just the painting).
So we don’t want that increasing the counters will increase the latency.
Instead, we’ll keep a buffer, the client will send ‘increase’ to the buffer.
The buffer will periodically increase the repository with “bulk incremental”.
I know it is possible to use directly Hazelcast or Couchbase or some other similar fast in-memory DB.
But for our use-case, that was the best solution.
The principle is simple:
- The dependent module will call a service to increase a counter for some key
- The implementation keeps a buffer of counters per key
- It is thread safe
- The writing happens in a separate thread
- Each write will do a bulk increase
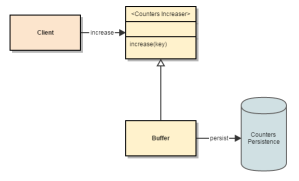
Counters High Level Design
Buffer
For the buffer, I used Google Guava cache.
Buffer Structure
private final LoadingCache<Counterable, BufferValue> cache;
...

this.cache = CacheBuilder.newBuilder()
	.maximumSize(bufferConfiguration.getMaximumSize())
	.expireAfterWrite(bufferConfiguration.getExpireAfterWriteInSec(), TimeUnit.SECONDS)
	.expireAfterAccess(bufferConfiguration.getExpireAfterAccessInSec(), TimeUnit.SECONDS)
	.removalListener((notification) -> increaseCounter(notification))
	.build(new BufferValueCacheLoader());
...
(Counterable is described below)
BufferValueCacheLoader implements the interface CacheLoader.
When we call increase (see below), we first get from the cache by key.
If the key does not exist, the loader returns value.
public class BufferValueCacheLoader extends CacheLoader<Counterable, BufferValue> {
	@Override
	public BufferValue load(Counterable key) {
		return new BufferValue();
	}
}
BufferValue wraps an AtomicInteger (I would need to change it to Long at some point)
Increase the Counter
public void increase(Counterable key) {
	BufferValue meter = cache.getUnchecked(key);
	int currentValue = meter.increment();
	if (currentValue > threashold) {
		if (meter.compareAndSet(currentValue, currentValue - threashold)) {
			increaseCounter(key, threashold);
		}
	}
}
When increasing a counter, we first get current value from cache (with the help of the loader. As descried above).
The compareAndSet will atomically check if has same value (not modified by another thread).
If so, it will update the value and return true.
If success (returned true), the the buffer calls the updater.
View the buffer
After developing the service, I wanted a way to view the buffer.
So I implemented the following method, which is used by the front-end layer (Dropwizard’s resource).
Small example of Java 8 Stream and Lambda expression.
return ImmutableMap.copyOf(cache.asMap())
	.entrySet().stream()
	.collect(
		Collectors.toMap((entry) -> entry.getKey().toString(),
		(entry) -> entry.getValue().getValue()));
MongoDB
I chose MongoDB because of two reasons:
- We have similar implementation in our system, which we decided to use MongoDB there as well.
- Easy to use with embedded server.
I tried to design the system so it’s possible to choose any other persist implementation and change it.
I used morphia as the MongoDB client layer instead of using directly the Java client.
With Morphia you create a dao, which is the connection to a MongoDB collection.
You also declare a simple Java Bean (POJO), that represent a document in a collection.
Once you have the dao, you can do operations on the collection the “Java way”, with fairly easy API.
You can have queries and any other CRUD operations, and more.
I had two operations: increasing counter and getting all counters.
The services implementations do not extend Morphia’s BasicDAO, but instead have a class that inherits it.
I used composition (over inheritance) because I wanted to have more behavior for both services.
In order to be consistent with the key representation, and to hide the way it is implemented from the dependent code, I used an interface: Counterable with a single method: counterKey().
public interface Counterable {
	String counterKey();
}
final class MongoCountersDao extends BasicDAO<Counter, ObjectId> {
	MongoCountersDao(Datastore ds) {
		super(Counter.class, ds);
	}
}
Increasing the Counter
@Override
protected void increaseCounter(String key, int value) {
	Query<Counter> query = dao.createQuery();
	query.criteria("id").equal(key);
	UpdateOperations<Counter> ops = dao.getDs().createUpdateOperations(Counter.class).inc("count", value);
	dao.getDs().update(query, ops, true);
}
Embedded MongoDB
In order to run tests on the persistence layer, I wanted to use an in-memory database.
There’s a MongoDB plugin for that.
With this plugin you can run a server by just creating it on runtime, or run as goal in maven / task in Gradle.
https://github.com/flapdoodle-oss/de.flapdoodle.embed.mongo
https://github.com/sourcemuse/GradleMongoPlugin
Embedded MongoDB on Gradle
I will elaborate more on Gradle later, but here’s what I needed to do in order to set the embedded mongo.
dependencies {
	// More dependencies here
	testCompile 'com.sourcemuse.gradle.plugin:gradle-mongo-plugin:0.4.0'
}
Setup Properties
mongo {
	//	logFilePath: The desired log file path (defaults to 'embedded-mongo.log')
	logging 'console'
	mongoVersion 'PRODUCTION'
	port 12345
	//	storageLocation: The directory location from where embedded Mongo will run, such as /tmp/storage (defaults to a java temp directory)
}
Embedded MongoDB Gradle Tasks
startMongoDb will just start the server. It will run until stopping it.
stopMongoDb will stop it.
startManagedMongoDb test , two tasks, which will start the embedded server before the tests run. The server will shut down when the jvm finishes (the tests finish)
Gradle
https://gradle.org/
Although I only touch the tip of the iceberg, I started seeing the strength of Gradle.
It wasn’t even that hard setting up the project.
Gradle Setup
First, I created a Gradle project in eclipse (after installing the plugin).
I needed to setup the dependencies. Very simple. Just like maven.
One Big JAR Output
When I want to create one big jar from all libraries in Maven, I use the shade plugin.
I was looking for something similar, and found gradle-one-jar pluging.
https://github.com/rholder/gradle-one-jar
I added that plugin
apply plugin: 'gradle-one-jar'
Added one-jar to classpath:
buildscript {
	repositories { mavenCentral() }
	dependencies {
		classpath 'com.sourcemuse.gradle.plugin:gradle-mongo-plugin:0.4.0'
		classpath 'com.github.rholder:gradle-one-jar:1.0.4'
	}
}
And added a task:
mainClassName = 'org.eyalgo.server.dropwizard.CountersBufferApplication'
task oneJar(type: OneJar) {
	mainClass = mainClassName
	archiveName = 'counters.jar'
	mergeManifestFromJar = true
}
Those were the necessary actions I needed to do in order to make the application run.
Dropwizard
Dropwizard is a stack of libraries that makes it easy to create web servers quickly.
It uses Jetty for HTTP and Jersey for REST. It has other mature libraries to create complicated services.
It can be used as an easy developed microservice.
As I explained in the introduction, I will not cover all of Dropwizard features and/or setup.
There are plenty of sites for that.
I will briefly cover the actions I did in order to make the application run.
Gradle Run Task
run { args 'server', './src/main/resources/config/counters.yml' }
First argument is server. Second argument is the location of the configuration file.
If you don’t give Dropwizard the first argument, you will get a nice error message of the possible options.
positional arguments:
  {server,check}         available commands
I already showed how to create one jar in the Gradle section.
Configuration
In Dropwizard, you setup the application using a class that extends Configuration.
The fields in the class should align to the properties in the yml configuration file.
It is a good practice to put the properties in groups, based on their usage/responsibility.
For example, I created a group for mongo parameters.
In order for the configuration class to read the sub groups correctly, you need to create a class that align to the properties in the group.
Then, in the main configuration, add this class as a member and mark it with annotation: @JsonProperty.
Example:
@JsonProperty("mongo")
private MongoServicesFactory servicesFactory = new MongoServicesFactory();
@JsonProperty("buffer")
private BufferConfiguration bufferConfiguration = new BufferConfiguration();
Example: Changing the Ports
Here’s part of the configuration file that sets the ports for the application.
server:
  adminMinThreads: 1
  adminMaxThreads: 64
  applicationConnectors:
    - type: http
      port: 9090
  adminConnectors:
    - type: http
      port: 9091
Health Check
Dropwizard gives basic admin API out of the box. I changed the port to 9091.
I created a health check for MongoDB connection.
You need to extend HealthCheck and implement check method.
private final MongoClient mongo;
...
protected Result check() throws Exception {
	try {
		mongo.getDatabaseNames();
		return Result.healthy();
	} catch (Exception e) {
		return Result.unhealthy("Cannot connect to " + mongo.getAllAddress());
	}
}
Other feature are pretty much self-explanatory or simple as any getting started tutorial.
Ideas for Enhancement
The are some things I may try to add.
- Add tests to the Dropwizard section.
This project started as PoC, so I, unlike usually, skipped the tests in the server part.
Dropwizard has Testing Dropwizard, which I want to try.
- Different persistence implementation. (couchbase? Hazelcast?).
- Injection using Google Guice. And with help of that, inject different persistence implementation.
That’s all.
Hope that helps.
Source code: https://github.com/eyalgo/CountersBuffering


