Continuous (Pre) Planning

Introduction

In this post I want to introduce the concept of continuously planning. A process flow that we established in my team.

Pre Planning – Short Description

One of the key meetings in a scrum cycle is the Pre-Planning.

Usually it’s a long meeting and after that, there are hours of writing subtasks and time estimations.

In this meeting the team members understand the user stories, challenge the PMs and do estimations. Later the developers will decide on solutions and break them into subtasks.

Background About the Team

Team Structure

My team is a cross-functional one. I have frontend and backend developers, as well as more DevOps oriented engineers.

It means that developers sometimes have independent tasks, which are related only to one or two of them.

Products We Own

We are responsible for three major products, and some minor ones.

In one sprint we work on different products. Those products are usually unrelated to each other. Meaning independent tasks.

Team Culture

In the beginning the team was small, as well as the company.

We had a “startup culture”.

Deliver fast, no planning, no estimations.

People hate long, boring meetings. Feel waste of time.

The Problem

As it turned out, there were many problems in the way we tried to work.

There were common issues that were raised in our retrospectives, as well as my personal observations.

Retrospective

Here’s a list of the main issues we noticed

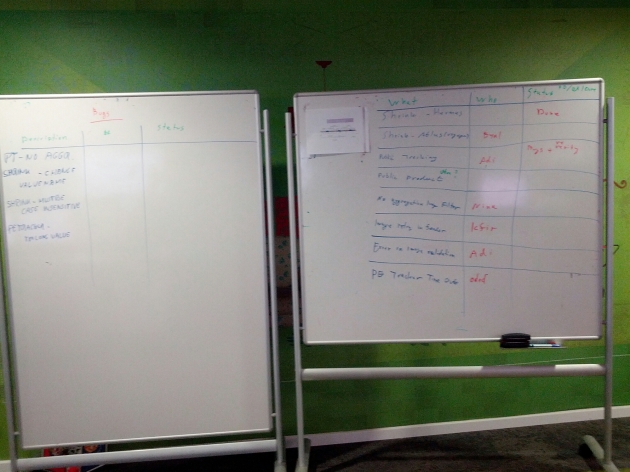
  • During planning, there were long discussions that were relevant to one engineer and the PM (as result of different products and cross-functional team). People were bored and lost concentration
  • Many user stories were not even started because we discovered that the PMs did not clarify them. We discovered that in the middle of the sprint.
  • User stories were not done because lack of planning
  • Overestimated / underestimated sprints content
  • Lack of ownership. Features were not done because dependencies issues were not thought in advance.

Solution – Continuous Planning

At some point we started doing things differently. After several iterations, it became the continuous planning.

The idea was simple. I asked our PM to provide user stories of next Sprint when current Sprint starts.

Then I checked them and assigned to the relevant developers or pushed back to the PM.

The developers started looking at the user stories, understood them and added planning using subtasks and time estimations.

So basically we had almost two weeks to plan for the next sprint.

How It Works

User Stories are ready in advance

The crucial part here, is the timing, when are the user story ready?

Let’s say the Sprint duration is two weeks and it starts on Wednesday.

The idea is simple: On Wednesday, when Sprint 18 starts, then PM should already provide all user stories for Sprint 19.

By provide I mean have them:

  1. In backlog, under Sprint 19 (we use JIRA, so we create sprints in advance)
  2. Well defined (Description, DoD, etc.)

First Check

The user stories are assigned to me and I go over them. I verify that they are clear with proper Definition of Done. I am identifying dependencies between the user stories. Then I either assign the user story to a developer or reassign it to the PM, challenging about the content or priority.

Discovery and Planning By Each Engineer

From now on, each engineer, during current Sprint, will start planning the assigned user stories for next sprint. He will talk directly to the PM for clarifications and will identify dependencies.

He has full authority to challenge the user story for not being clear. He can reassign it back to me or the PM.

Collaboration

If there is dependency within the team, like FE and BE, then the engineers themselves will talk about it and assign the relevant subtasks in the user stories.

Estimations

The estimations are part of the planning.

Each developer will add his own subtasks with time estimation.

Timing Goal – It’s All About “When”

The key element for success in this process is timing. Our goal is that all user stories for next sprint will be fully provided in the beginning of current sprint.

We also aim to have all user stories planned (subtasks + estimations) 1-2 days before next sprint starts.

Observations and conclusion

Our process is still improving. Currently around 10%-20% of the user stories still come at the last minute, violating the timing goal.

We also encounter dependencies, which we didn’t find while planning.

Here’s a list of pros and cons I already see

Pros

Responsibilities and Ownership

One of the outcomes, which I didn’t anticipate, is that each developer has much more responsibility and ownership on the user stories.

The engineer must think of the requirement, then design and find dependencies, besides just the execution.

On boarding new team members

New team members arrived and had a user story assigned to them on their first day in the office. So “they jumped into the cold water”, and started understanding the feature, system and code almost immediately.

Collaboration

As each team member is responsible of the entire feature, it increased the collaboration between the team members. There is constant discussion between the team members.

It has also increased the collaboration and communication between developers and PMs.

PM Work

As the PM works harder (see cons), the continuously planning forces him to have better planning ahead.

This process “forced” the PM to have clear vision of 3-4 sprints in advance. This clear vision is transparent to everyone, as it is reflected in the JIRA backlog board.

Visibility and Planning Ahead

The clear vision of the PM is reflected in the backlog (JIRA board in our case), make it more transparent, As the board is usually filled with backlog, which is divided to sprints the visibility of future plan is much better.

Challenges (cons)

PM Work

It seems that the PM has more work. User stories should be ready in 1-2 weeks in advance.

The PM needs to work on future sprints (plural) while answering questions about next Sprint and verifying current sprint status.

Questionable Capacity

When there is a dedicated meeting / day for the preplanning, it’s easier to measure the capacity of the team.

It’s harder to understand the real capacity of the team while the developers spend time on planning next sprint during current one.

Architectural and design decisions

Everyone needs to be much more careful in architectural and design of the system. As each developer plan his part, he needs to be more aware of plans of other developers.

This where the manager / lead should assist. Checking that everyone is aligned and make sure there’s good communication.

Lose Control

The lead / manager has less control. Meaning, not everything passes through him.
If you’re micromanager, you will need to let go.

We identified points were the manager (me) must be involved.

  • Dependencies within the team and / or with other teams
  • Architectural / design decisions
  • System behavior

Conclusion

We established a well understood, simple to follow, clear process.

This process is good for our team. It may be good for other teams, perhaps with some adjustments.

As described above, if

  1. There are different roles in the team (frontend, backend)
  2. The team works on different products / projects in the same sprint
  3. People feel that the pre planning meeting is a waste of time

Then perhaps continuous planning is a good approach.

This post was originally published in our company's tech blog:
 http://techblog.applift.com/continuous-pre-planning

Linkedin Twitter facebook github

Continuous Deployment circleci, AWS (Elastic Beanstalk), Docker

Introduction

We run some of our services in Docker container, under Elastic Beanstalk (EB).
We use circleci for our CI cycle.
EB, Docker and Circlec integrate really nice for automatic deployment.

It’s fairly easy to set up all the services to work together.
In this post, I am summarising the steps to do it.

About EB Applications and Versions

Elastic Beanstalk has the concepts of application, environments and application-versions.
The automatic steps that I describe here are up to the point of creating a new application-version in EB.
The actual deployment is done manually using Elastic Beanstalk management UI. I describe it as well.

Making that final step automatic is easy, and I will add a post about it in the future.

I am not going to describe the CI cycle (test, automation, etc.).
It’s a completely different, very important topic.
But out of scope for this post.
Connecting GitHub to circleci is out of scope of this post as well.

The Architecture

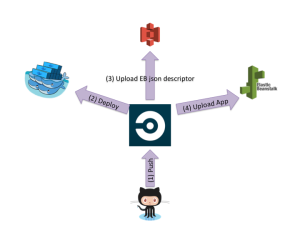
There are four different services that I need to integrate:

Basic Flow

Everything starts with push to GitHub.
(which I didn’t include in the list above).
Once we push something to GitHub, circleci is triggered and runs based on the circle.yml file.
The CI will create the Docker image and upload it to Docker-hub. We use private repository.
Next step, CI will upload a special json file to S3. This file will tell EB from where to get the image, the image and other parameters.
As the last step, for delivery, it will create a new Application Version in EB.

Process Diagram

CI Docker EB Deployment High Level Architecture

CI Docker EB Deployment High Level Architecture

The description and diagram above are for the deployment part from CI (GitHub) to AWS (EB).
It doesn’t describe the last part for deploying a new application revision in EB.
I will describe that later in this post.

Permissions

The post describes how to work with private repository in docker hub.
In order to work with the private repository, there are several permission we need to set.

  • circleci needs to be able to:
    1. Upload image to Docker-Hub
    2. Upload a JSON file to a bucket in S3
    3. Call an AWS command to Elastic Benastalk (create new application revision)
  • AWS EB needs to be able to:
    1. Pull (get/list) data from S3 bucket
    2. Pull an image from Docker-Hub

I am omitting the part of creating user in GitHub, Circleci, Docker-Hub and AWS.

Docker authentication

Before we set up authentication, we need to login to Docker and create a dockercfg file.

dockercfg file

Docker has a special configuration file, usually named .dockercfg.
We need to produce this file for the user who has permissions to upload images to docker-hub and to download images.
In order to create it, you need to run the following command:
docker login
This command will create the file in ~/.docker/.dockercfg
If you want to create this file for a different email (user), use -e option.
Check: docker login doc
Important
The format of the file is different for Docker version 1.6 and 1.7.
Currently, we need to use 1.6 format. Otherwise AWS will not be able to connect to the repository.

“Older” Version, Docker 1.6

{
  "https://index.docker.io/v1/": {
    "auth": "AUTH_KEY",
    "email": "DOCKER_EMAIL"
  }
}

Newer (Docker 1.7) version of the configuration file

This will probably be the file that was generated in your computer.

{
  "auths": {
    "https://index.docker.io/v1/": {
      "auth": "AUTH_KEY",
      "email": "DOCKER_EMAIL"
    }
  }
}

The correct format is based on the Docker version EB uses.
We need to add it to an accessible S3 bucket. This is explained later in the post.

Uploading from Circleci to Docker Hub

Setting up a user in Docker Hub

  1. In docker hub, create a team (for your organisation).
  2. In the repository, click ‘Collaborators’ and add this team with write permission.
  3. Under the organisation, click on teams. Add the “deployer” user to the team. This is the user that has the file previously described.

I created a special user, with specific email specifically for that.
The user in that team (write permission) need to have a dockercfg file.

Setting up circle.yml file with Docker-Hub Permissions

The documentation explains to set permissions like this:
docker login -e $DOCKER_EMAIL -u $DOCKER_USER -p $DOCKER_PASS
But we did it differently.
In the deployment part, we manipulated the dockercfg file.
Here’s the part in out circle.yml file:

commands:
  - |
    cat > ~/.dockercfg << EOF
    {
      "https://index.docker.io/v1/": {
        "auth": "$DOCKER_AUTH",
        "email": "$DOCKER_EMAIL"
      }
    }
    EOF

Circleci uses environment variables. So we need to set them as well.
We need to set the docker authentication key and email.
Later we’ll set more.

Setting Environment Variables in circleci

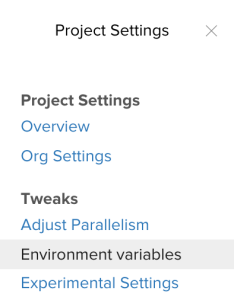
Under setting of the project in Circelci, click Environment Variables.

Settings -> Environment Variables

Settings -> Environment Variables

Add two environment variables: DOCKER_AUTH and DOCKER_EMAIL
The values should be the ones from the file that was created previously.

Upload a JSON file to a bucket in S3

Part of the deployment cycle is to upload a JSON descriptor file to S3.
So Circleci needs to have permissions for this operation.
We’ll use the IAM permission policies of AWS.
I decided to have one S3 bucket for all deployments of all projects.
It will make my life much easier because I will be able to use the same user, permissions and policies.
Each project / deployable part will be in a different directory.

Following are the steps to setup AWS environment.

  1. Create the deployment bucket
  2. Create a user in AWS (or decide to use an exiting one)
  3. Keep the user’s credentials provided by AWS (downloaded) at hand
  4. Create Policy in AWS that allows to:
    1. access the bucket
    2. create application version in EB
  5. Add this policy to the user (that is set in circleci)
  6. Set environment variables in Circleci with the credentials provided by AWS

Creating the Policy

In AWS, go to IAM and click Policies in left navigation bar.
Click Create Policy.
You can use the policy manager, or you can create the following policy:

{
    "Version": "2012-10-17",
    "Statement": [
        {
            "Sid": "Stmt1443479777000",
            "Effect": "Allow",
            "Action": [
                "s3:GetObject",
                "s3:ListBucket",
                "s3:PutObject"
            ],
            "Resource": [
                "arn:aws:s3:::MY_DEPLOY_BUCKET/*"
            ]
        },
        {
            "Sid": "Stmt1443479924000",
            "Effect": "Allow",
            "Action": [
                "elasticbeanstalk:CreateApplicationVersion"
            ],
            "Resource": [
                "arn:aws:elasticbeanstalk:THE_EB_REGION:MY_ACCOUNT:applicationversion/*"
            ]
        }
    ]
}

As mentioned above, this policy allows to access specific bucket (MY_DEPLOY_BUCKET), sub directory.
And it allows to trigger the creation of new application version in EB.
This policy will be used by the user who is registered in circleci.

AWS Permissions in Circleci

Circleci has special setting for AWS integration.
In the left navigation bar, click AWS Permissions.
Put the access key and secret in the correct fields.
You should have these keys from the credentials file that was produced by AWS.

Pull (get/list) data from S3 bucket

We now need to give access to the EB instances to get some data from S3.
The EB instance will need to get the dockercfg file (described earlier)
In EB, you can set an Instance profile. This profile will give the instance permissions.
But first, we need to create a policy. Same as we did earlier.

Create a Policy in AWS

{
    "Version": "2012-10-17",
    "Statement": [
        {
            "Sid": "Stmt1443508794000",
            "Effect": "Allow",
            "Action": [
                "s3:GetObject",
                "s3:ListBucket"
            ],
            "Resource": [
                "arn:aws:s3:::MY_DEPLOY_BUCKET",
                "arn:aws:s3:::MY_DEPLOY_BUCKET/*"
            ]
        }
    ]
}

This policy gives read access to the deployment bucket and the sub directories.
The EB instance will need to have access to the root directory of the bucket because this is were I will put the dockercfg file.
It needs the sub directory access, because this is the location were circleci uploads the JSON descriptor files.

Set this policy for the EB instance

In the EB dashboard:

  1. Go to Application Dashboard (click the application you are setting) ➜
  2. Click the environment you want to automatically deploy ➜
  3. Click Configuration in the left navigation bar ➜
  4. Click the settings button of the instances ➜
  5. You will see Instance profile
    You need to set a role.
    Make sure that this role has the policy you created in previous step. ➜
  6. Apply changes

Pull an image from Docker-Hub

In order to let EB instance be able to download image from Dockerhub, we need to give it permissions.
EB uses the dockercfg for that.
Upload dockercfg (described above) to the the bucket that EB has permission (in my example: MY_DEPLOY_BUCKET)
Put it in the root directory of the bucket.
Later, you will set environment variables in circleci with this file name.

Setting Up Circleci Scripts

After setting up all permissions and environments, we are ready to set circleci scripts.
Circleci uses circle.yml file to configure the steps for building the project.
In this section, I will explain how to configure this file for continuous deployment using Docker and EB.
Other elements in that file are out of scope.
I added the sample scripts to GitHub.

circle.yml File

Following are the relevant parts in the circle.yml file

machine:
  services:
# This is a Docker deployment
    - docker
  environment:
# Setting the tag for Docker-hub
    TAG: $CIRCLE_BRANCH-$CIRCLE_SHA1
# MY_IMAGE_NAME is hard coded in this file. The project’s environment variables do not pass at this stage.
    DOCKER_IMAGE: MY_ORGANIZATION/MY_IMAGE_NAME:$CIRCLE_BRANCH-$CIRCLE_SHA1

deployment:
# An example for on environment
  staging:
# The ‘automatic-.*’ is hook so we can automatically deploy from different branches.
# Usually we deploy automatically after a pull-request is merged to master.
    branch: [master, /automatic-.*/]
# This is our way for setting docker cfg credentials. We set project’s environment variables with the values.
    commands:
      - |
          cat > ~/.dockercfg << EOF
          {
              "https://index.docker.io/v1/": {
                  "auth": "$DOCKER_AUTH",
                  "email": "$DOCKER_EMAIL"
              }
          }
          EOF
# Sample for RoR project. Not relevant specifically to Docker.
      - bundle package --all
# Our Dockerfile.app is located under directory: docker-images
      - docker build -t $DOCKER_IMAGE -f docker-images/Dockerfile.app .
      - docker push $DOCKER_IMAGE
# Calling script for uploading JSON descriptor file
      - sh ./create_docker_run_file.sh $TAG
# Calling script for setting new application version in AWS EB
      - sh ./upload_image_to_elastcbeanstalk.sh $TAG 

Template Descriptor File

AWS EB uses a JSON file in order to have information of docker hub.
It needs to know where the image is (organisation, image, tag).
It also needs to know where to get the dockercfg file from.
Put this file in your root directory of the project.

{
  "AWSEBDockerrunVersion": "1",
  "Authentication": {
    "Bucket": "<DEPLOYMENT_BUCKET>",
    "Key": "<AUTHENTICATION_KEY>"
  },
  "Image": {
    "Name": “MY_ORGANIZATION/<IMAGE_NAME>:<TAG>",
    "Update": "true"
  },
  "Ports": [
    {
      "ContainerPort": "<EXPOSED_PORTS>"
    }
  ]
}

The first script we run will replace the tags and create a new file.
The environment variables list is described below.

Script that manipulates the descriptor template file

Put this file in your root directory of the project.

#! /bin/bash
DOCKER_TAG=$1

# Prefix of file name is the tag.
DOCKERRUN_FILE=$DOCKER_TAG-Dockerrun.aws.json

# Replacing tags in the file and creating a file.
sed -e "s/<TAG>/$DOCKER_TAG/" -e "s/<DEPLOYMENT_BUCKET>/$DEPLOYMENT_BUCKET/" -e "s/<IMAGE_NAME>/$IMAGE_NAME/" -e "s/<EXPOSED_PORTS>/$EXPOSED_PORTS/" -e "s/<AUTHENTICATION_KEY>/$AUTHENTICATION_KEY/" < Dockerrun.aws.json.template > $DOCKERRUN_FILE

S3_PATH="s3://$DEPLOYMENT_BUCKET/$BUCKET_DIRECTORY/$DOCKERRUN_FILE"
# Uploading json file to $S3_PATH
aws s3 cp $DOCKERRUN_FILE $S3_PATH 

Script that adds a new application version to EB

The last automated step is to trigger AWS EB with a new application version.
Using label and different image per commit (in master), helps tracking which version is on which environment.
Even if we use single environment (“real” continuous deployment), it’s easier to track and also to rollback.
Put this file in your root directory of the project.

#! /bin/bash

DOCKER_TAG=$1
DOCKERRUN_FILE=$DOCKER_TAG-Dockerrun.aws.json
EB_BUCKET=$DEPLOYMENT_BUCKET/$BUCKET_DIRECTORY

# Run aws command to create a new EB application with label
aws elasticbeanstalk create-application-version --region=$REGION --application-name $AWS_APPLICATION_NAME 
    --version-label $DOCKER_TAG --source-bundle S3Bucket=$DEPLOYMENT_BUCKET,S3Key=$BUCKET_DIRECTORY/$DOCKERRUN_FILE

Setting up environment variables in circleci

In order to make the scripts and configuration files reusable, I used environment variables all over the place.
Following are the environment variables I using for the configuration file and scripts.

AUTHENTICATION_KEY – The name of the dockercfg file, which is in the S3 bucket.
AWS_APPLICATION_NAME – Name of the application in EB
BUCKET_DIRECTORY – The directory where we upload the JSON descriptor files
DEPLOYMENT_BUCKET – S3 bucket name
DOCKER_AUTH – The auth key to connect to dockerhub (created using docker login)
DOCKER_EMAIL – The email of the auth key
EXPOSED_PORTS – Docker ports
IMAGE_NAME – Every Docker image has a name. Then it is: Organisation:Image-Name
REGION – AWS region of the EB application

Some of the environment variables in the script/configuration files are provided by circleci (such as CIRCLE_SHA1 and CIRCLE_BRANCH)

Deploying in AWS EB

Once an application version is uploaded to EB, we can decide to deploy it to an environment in EB.
Follow these steps:

  1. In EB, in the application dashboard, click Application Versions in the left nav bar
  2. You will see a table with all labeled versions. Check the version you want to deploy (SHA1 can assist knowing the commit and content of the deployment)
  3. Click deploy
  4. Select environment
  5. You’re done
Aws EB Application Versions

AWS EB Application Versions

Summary

Once you do a setup for one project, it is easy to reuse the scripts and permissions for other projects.
Having this CD procedure makes the deployment and version tracking an easy task.
The next step, which is to deploy the new version to an EB environment is very easy. And I will add a different post for that.

Sample files in GitHub

Edit: This is helpful for setting AWS permissions –
https://gist.github.com/magnetikonline/5034bdbb049181a96ac9

Linkedin Twitter facebook github

SRP as part of SOLID

Clean Code Alliance organized a meetup about SOLID principles.
I had the opportunity to talk about Single Responsibility Principle at part of SOLID.
It’s a presentation I gave several times in the past.

It was fun talking about it.
There were many interesting and challenging questions, which gave me lots of things to think of.

Title:
SRP as part of SOLID

Abstract:
Single Responsibility Principle (SRP), is the part of the SOLID acronym.The SOLID principles help us design better code. Applying those principles helps us having maintainable code, less bugs and easier testing.The SRP is the foundation of having better designed code.In this session I will introduce the SOLID principles and explain in more details what SRP is all about.Applying those principles is not sci-fi, it is real, and I will demonstrate it.
Yesterday I gave a talk in a meetup about the SRP in SOLID.

Bio:
Eyal Golan is a Senior Java developer and agile practitioner. Responsible of building the high throughput, low latency server infrastructure.Manages the continuous integration and deployment of the system. Leading the coding practices. Practicing TDD, clean code. In the path for software craftsmanship.

Following me, Hayim Makabee gave a really interesting talk about The SOLID Principles Illustrated by Design Patterns

Here are the slides.

And the video (in Hebrew)

Thanks for the organizers, Boris and Itzik and mostly for the audience who seemed very interested.

Linkedin Twitter facebook github

dropwizard-jobs – My First Open Source Contribution

I am very exited today.
Today I did an actual contribution to the open source community.
I helped publishing Java libraries to maven central.

The library we published is a plugin for dropwizard that uses quartz:
https://github.com/spinscale/dropwizard-jobs

You can check it out. The README explains how to use it.
In this post I will not explain the plugin, but I will share my contribution experience to an open source project.

Why Even Contribute

There are so many reasons. Google is full of them.
I did it because I really wanted to help the community (In this case, the originators of the code).
It improves my skill-sets. I know now more than I knew before.
Exposed to technologies and processes which I usually don’t use.
Part of my digital signature and branding.

Why This Project

I know about dropwizard for more than a year.
I didn’t have the chance to use it at work.
I did some experiments with dropwizard to get the filling of it.

In one of my POCs, I wanted to create a scheduling mechanism in the micro-service I created.
By searching Google, I found this project.
First of all, I liked what it does and how.
I also liked the explanation (how to use it). It’s clear and I could work with it immediately.
I think the developers did a good job.

How It (my contribution) All Started

But one thing was missing. It wasn’t in maven repository (central or any other public repository).
So I asked whether the developers plan to publish it.

Issue #10 in the repository shows my question and the beginning of the conversation.
Issue 10, question from 2015/02/24

Basically the problem was the time to spend in order to comply requirements. The code itself was working.

My Contribution

I took upon myself to publish it to public maven repository.
I have never done something like that, so I wasn’t sure what to do.
I thought of using bintray by JFrog.
Eventually I decided to use sonatype. It felt more comfortable. So I started reading about OSSRH (Open Source Project Repository Hosting).
There’s an explanation for that below.

I forked the code to my GitHub account and used pull requests in order to merge the code I pushed.
I mostly modified the pom files so comply Sonatype requirements as explained in the tutorials.

Once we were all set, I did the actual publishing.
And now it’s there. Everyone can use it.

At first I was extra careful with any change. After all, “it’s not my code”…
Over time, I felt more comfortable modifying and pull requesting.

How To Upload to Sonatype

I used the tutorials, which explain clearly what to do.
http://central.sonatype.org/pages/ossrh-guide.html

  1. Create a user at OSSRH
  2. Open an issue with links to GitHub. Group ID and artifact ID
  3. Follow instructions (In our case, I had to modify the maven’s groups ID)
  4. Add the correct plugins to the pom file
    maven
    pgp – read it carefully
  5. Deploy

Contributors

Linkedin Twitter facebook github

Fedora Installation

Aggregate Installation Tips

One of the reasons I am writing this blog, is to keep “log” for myself on how I resolved issues.

In this post I will describe how I installed several basic development tools on a Fedora OS.
I want this laptop to be my workstation for out-of-work projects.

Almost everything in this post can be found elsewhere in the web.
Actually, most of what I am writing here is from other links.

However, this post is intended to aggregate several installations together.

If you’re new to Linux (or not an expert, as I am not), you can learn some basic stuff here.
How to install (yum), how to create from source code, how to setup environment variables and maybe other stuff.

First, we’ll start with how I installed Fedora.

Installing Fedora

I downloaded Fedora ISO from https://getfedora.org/en/workstation/.
It is Gnome distribution.
I then used http://www.linuxliveusb.com/ to create a self bootable USB. It’s very easy to use.
I switched to KDE by running: sudo yum install @kde-desktop

Installing Java

Download the rpm package Oracle site.

# root
su -
# Install JDK in system
rpm -Uvh /path/.../jdk-8u40-linux-i586.rpm
# Use correct Java
alternatives --install /usr/bin/java java /usr/java/latest/jre/bin/java 2000000
alternatives --install /usr/bin/javac javac /usr/java/latest/bin/javac 2000000
alternatives --install /usr/bin/javaws javaws /usr/java/latest/jre/bin/javaws 2000000
alternatives --install /usr/bin/jar jar /usr/java/latest/bin/jar 2000000
# Example how to swap javac
# alternatives --config javac
view raw install-jdk.sh hosted with ❤ by GitHub

Under /etc/profile.d/ , create a file (jdk_home.sh) with the following content:

# Put this file under /etc/profile.d
export JAVA_HOME=/usr/java/latest
export PATH=$PATH:JAVA_HOME/bin
view raw jdk_home.sh hosted with ❤ by GitHub

I used the following link, here’d how to install JDK
http://www.if-not-true-then-false.com/2014/install-oracle-java-8-on-fedora-centos-rhel/

Installing Intellij

Location: https://www.jetbrains.com/idea/download/

# root
su -
# Create IntelliJ location
mkdir -p /opt/idea
# Untar installation
tar -xvzf /path/.../ideaIC-14.1.tar.gz -C /opt/idea
# Create link for latest IntelliJ
ln -s /opt/idea/idea-IC-141.177.4/ /opt/idea/latest
chmod -R +r /opt/idea
view raw idea-install.sh hosted with ❤ by GitHub

Check https://www.jetbrains.com/idea/help/basics-and-installation.html

After installation, you can go to /opt/idea/latest/bin and run idea.sh
Once you run it, you will be prompt to create a desktop entry.
You can create a command line launcher later on as well.

Installing eclipse

Location: http://www.eclipse.org/downloads/

su -
# create eclipse location
mkdir /opt/eclipse
# Unzip it
tar -xvzf /path/.../eclipse-java-luna-SR2-linux-gtk.tar.gz -C /opt/eclipse
# create link
ln -s /opt/eclipse/eclipse/ /opt/eclipse/latest
# Permissions
hmod -R +r /opt/eclipse/

Create executable /usr/bin/eclipse
#!/bin/sh
# name it eclipse
# put it in /usr/bin
# chmod 755 /usr/bin/eclipse
export ECLIPSE_HOME="/opt/eclipse/latest"
$ECLIPSE_HOME/eclipse $*
view raw eclipse.sh hosted with ❤ by GitHub

Create Desktop Launcher
# create /usr/local/share/applications/eclipse.desktop
# Paste the following
[Desktop Entry]
Encoding=UTF-8
Name=Eclipse
Comment=Eclipse Luna 4.4.2
Exec=eclipse
Icon=/opt/eclipse/latest/icon.xpm
Terminal=false
Type=Application
Categories=Development;IDE;
StartupNotify=true
view raw eclipse.desktop hosted with ❤ by GitHub

See also http://www.if-not-true-then-false.com/2010/linux-install-eclipse-on-fedora-centos-red-hat-rhel/

Installing Maven

Download https://maven.apache.org/download.cgi

# root
su -
# installation location
mkdir /opt/maven
# unzip
tar -zxvf /path/.../apache-maven-3.3.1-bin.tar.gz -C /opt/maven
# link
ln -s /opt/maven/apache-maven-3.3.1/ /opt/maven/latest

Setting maven environment
# put it in /etc/profile.d
export M2_HOME=/opt/maven/latest
export M2=$M2_HOME/bin
export PATH=$M2:$PATH
view raw maven-env.sh hosted with ❤ by GitHub

Installing git

I wanted to have the latest git client.
Using yum install did not make it, so I decided to install from source code.
I found a great blog explaining how to do it.
http://tecadmin.net/install-git-2-0-on-centos-rhel-fedora/
Note: in the compile part, he uses export to /etc/bashrc .
Don’t do it. Instead create a file under /etc/profile.d
Installation commands

su -
yum install curl-devel expat-devel gettext-devel openssl-devel zlib-devel
yum install gcc perl-ExtUtils-MakeMaker
yum remove git
# Download source
# check latest version in http://git-scm.com/downloads
cd /usr/src
wget https://www.kernel.org/pub/software/scm/git/git-<latest-version&gt;.tar.gz
tar xzf git-<latest-version>.tar.gz
# create git from source code
cd git-<latest-version>
make prefix=/opt/git all
make prefix=/opt/git install
view raw install-git.sh hosted with ❤ by GitHub

git Environment
Create an ‘sh’ file under /etc/profile.d
# save under /etc/profile.d/git-env.sh
export PATH=$PATH:/opt/git/bin
view raw git-env.sh hosted with ❤ by GitHub

Linkedin Twitter facebook github

Working with Legacy Test Code

Legacy Code and Smell by Tests

Working with unit tests can help in many ways to improve the code-base.
One of the aspects, which I mostly like, is that tests can point us to code smell in the production code.
For example, if a test needs large setup or assert many outputs, it can point that the unit under test doesn’t follow good design, such as SRP and other OOD.

But sometimes the tests themselves are poorly structured or designed.
In this post I will give two examples for such cases, and show how I solved it.

Test Types

(or layers)
There are several types, or layers, of tests.

  • Unit Tests
    Unit test should be simple to describe and to understand.
    Those tests should run fast. They should test one thing. One unit (method?) of work.
  • Integration Tests
    Integration tests are more vague in definition.
    What kind of modules do they check?
    Integration of several modules together? Dependency-Injector wiring?
    Test using real DB?
  • Behavioral Tests
    Those tests will verify the features.
    They may be the interface between the PM / PO to the dev team.
  • End2End / Acceptance / Staging / Functional
    High level tests. May run on production or production-like environment.

Complexity of Tests

Basically, the “higher level” the test, the more complex it is.
Also, the ratio between possible number of tests and production code increase dramatically per test level.
Unit tests will grow linearly as the code grows.
But starting with integration tests and higher level ones, the options start to grow in exponential rate.
Simple calculation:
If two classes interact with each other, and each has 2 methods, how many option should we check if we want to cover all options? And imagine that those methods have some control flow like if.

Sporadically Failing Tests

There are many reasons for a test to be “problematic”.
One of the worst is a test that sometimes fails and usually passes.
The team ignores the CI’s mails. It creates noise in the system.
You can never be sure if there’s a bug or something was broken or it’s a false alarm.
Eventually we’ll disable the CI because “it doesn’t work and it’s not worth the time”.

Integration Test and False Alarm

Any type of test is subject for false alarms if we don’t follow basic rules.
The higher test level, there’s more chance for false alarms.
In integration tests, there’s higher chance for false alarms due to external resources issues:
No internet connection, no DB connection, random miss and many more.

Our Test Environment

Our system is “quasi legacy”.
It’s not exactly legacy because it has tests. Those test even have good coverage.
It is legacy because of the way it is (un)structured and the way the tests are built.
It used to be covered only by integration tests.
In the past few months we started implementing unit tests. Especially on new code and new features.

All of our integration tests inherit from BaseTest, which inherits Spring’s AbstractJUnit4SpringContextTests.
The test’s context wires everything. About 95% of the production code.
It takes time, but even worse, it connects to real external resources, such as MongoDB and services that connect to the internet.

In order to improve tests speed, a few weeks ago I change MongoDB to embedded. It improved the running time of tests by order of magnitude.

This type of setup makes testing much harder.
It’s very difficult to mock services. The environment is not isolated from the internet and DB and much more.

After this long introduction, I want to describe two problematic tests and the way I fixed them.
Their common failing attribute was that they sometimes failed and usually passed.
However, each failed for different reason.

Case Study 1 – Creating Internet Connection in the Constructor

The first example shows a test, which sometimes failed because of connection issues.
The tricky part was, that a service was created in the constructor.
That service got HttpClient, which was also created in the constructor.

Another issue, was, that I couldn’t modify the test to use mocks instead of Spring wiring.
Here’s the original constructor (modified for the example):

private HttpClient httpClient;
private MyServiceOne myServiceOne;
private MyServiceTwo myServiceTwo;

public ClassUnderTest(PoolingClientConnectionManager httpConnenctionManager, int connectionTimeout, int soTimeout) {
	HttpParams httpParams = new BasicHttpParams();
	HttpConnectionParams.setConnectionTimeout(httpParams, connectionTimeout);
	HttpConnectionParams.setSoTimeout(httpParams, soTimeout);
	HttpConnectionParams.setTcpNoDelay(httpParams, true);
	httpClient = new DefaultHttpClient(httpConnenctionManager, httpParams);

	myServiceOne = new MyServiceOne(httpClient);
	myServiceTwo = new MyServiceTwo();
}

The tested method used myServiceOne.
And the test sometimes failed because of connection problems in that service.
Another problem was that it wasn’t always deterministic (the result from the web) and therefore failed.

The way the code is written does not enable us to mock the services.

In the test code, the class under test was injected using @Autowired annotation.

The Solution – Extract and Override Call

Idea was taken from Working Effectively with Legacy Code.

  1. Identifying what I need to fix.
    In order to make the test deterministic and without real connection to the internet, I need access for the services creation.
  2. I will introduce a protected methods that create those services.
    Instead of creating the services in the constructor, I will call those methods.
  3. In the test environment, I will create a class that extends the class under test.
    This class will override those methods and will return fake (mocked) services.

Solution’s Code

public ClassUnderTest(PoolingClientConnectionManager httpConnenctionManager, int connectionTimeout, int soTimeout) {
	HttpParams httpParams = new BasicHttpParams();
	HttpConnectionParams.setConnectionTimeout(httpParams, connectionTimeout);
	HttpConnectionParams.setSoTimeout(httpParams, soTimeout);
	HttpConnectionParams.setTcpNoDelay(httpParams, true);
	
	this.httpClient = createHttpClient(httpConnenctionManager, httpParams);
	this.myserviceOne = createMyServiceOne(httpClient);
	this.myserviceTwo = createMyServiceTwo();
}

protected HttpClient createHttpClient(PoolingClientConnectionManager httpConnenctionManager, HttpParams httpParams) {
	return new DefaultHttpClient(httpConnenctionManager, httpParams);
}

protected MyServiceOne createMyServiceOne(HttpClient httpClient) {
	return new MyServiceOne(httpClient);
}

protected MyServiceTwo createMyServiceTwo() {
	return new MyServiceTwo();
}
private MyServiceOne mockMyServiceOne = mock(MyServiceOne.class);
private MyServiceTwo mockMyServiceTwo = mock(MyServiceTwo.class);
private HttpClient mockHttpClient = mock(HttpClient.class);

private class ClassUnderTestForTesting extends ClassUnderTest {

	private ClassUnderTestForTesting(int connectionTimeout, int soTimeout) {
		super(null, connectionTimeout, soTimeout);
	}
	
	@Override
	protected HttpClient createHttpClient(PoolingClientConnectionManager httpConnenctionManager, HttpParams httpParams) {
		return mockHttpClient;
	}

	@Override
	protected MyServiceOne createMyServiceOne(HttpClient httpClient) {
		return mockMyServiceOne;
	}

	@Override
	protected MyServiceTwo createMyServiceTwo() {
		return mockMyServiceTwo;
	}
}

Now instead of wiring the class under test, I created it in the @Before method.
It accepts other services (not described here). I got those services using @Autowire.

Another note: before creating the special class-for-test, I ran all integration tests of this class in order to verify that the refactoring didn’t break anything.
I also restarted the server locally and verified everything works.
It’s important to do those verification when working with legacy code.

Case Study 2 – Statistical Tests for Random Input

The second example describes a test that failed due to random results and statistical assertion.

The code did a randomize selection between objects with similar attributes (I am simplifying here the scenario).
The Random object was created in the class’s constructor.

Simplified Example:

private Random random;

public ClassUnderTest() {
	random = new Random();
	// more stuff
}

//The method is package protected so we can test it
MyPojo select(List<MyPojo> pojos) {
	// do something
	int randomSelection = random.nextInt(pojos.size());
	// do something
	return pojos.get(randomSelection);
}

The original test did a statistical analysis.
I’ll just explain it, as it is too complicated and verbose to write it.
It had a loop of 10K iterations. Each iteration called the method under test.
It had a Map that counted the number of occurrences (returned result) per MyPojo.
Then it checked whether each MyPojo was selected at (10K / Number-Of-MyPojo) with some kind of deviation, 0.1.
Example:
Say we have 4 MyPojo instances in the list.
Then the assertion verified that each instance was selected between 2400 and 2600 times (10K / 4) with deviation of 10%.

You can expect of course that sometimes the test failed. Increasing the deviation will only reduce the number of false fail tests.

The Solution – Overload a Method

  1. Overload the method under test.
    In the overloaded method, add a parameter, which is the same as the global field.
  2. Move the code from the original method to the new one.
    Make sure you use the parameter of the method and not the class’s field. Different names can help here.
  3. Tests the newly created method with mock.

Solution Code

private Random random;

// Nothing changed in the constructor
public ClassUnderTest() {
	random = new Random();
	// more stuff
}

// Overloaded method
private select(List<MyPojo> pojos) {
	return select(pojos, this.random);
}

//The method is package protected so we can test it
MyPojo select(List<MyPojo> pojos, Random inRandom) {
	// do something
	int randomSelection = inRandom.nextInt(pojos.size());
	// do something
	return pojos.get(randomSelection);
}

Conclusion

Working with legacy code can be challenging and fun.
Working with legacy test code can be fun as well.
It feels really good to stop receiving annoying mails of failing tests.
It also increase the trust of the team on the CI process.

Linkedin Twitter facebook github

Dropwizard, MongoDB and Gradle Experimenting

Introduction

I created a small project using Dropwizard, MongoDB and Gradle.
It actually started as an experimenting Guava cache as buffer for sending counters to MongoDB (or any other DB).
I wanted to try Gradle with MongoDB plugin as well.
Next, I wanted to create some kind of interface to check this framework and I decided to try out DropWizard.
And this is how this project was created.

This post is not a tutorial of using any of the chosen technologies.
It is a small showcase, which I did as an experimentation.
I guess there are some flaws and maybe I am not using all “best practices”.
However, I do believe that the project, with the help of this post, can be a good starting point for the different technologies I used.
I also tried to show some design choices, which help achieving SRP, decoupling, cohesion etc.

I decided to begin the post with the use-case description and how I implemented it.
After that, I will explain what I did with Gradle, MongoDB (and embedded) and Dropwizard.

Before I begin, here’s the source code:
https://github.com/eyalgo/CountersBuffering

The Use-Case: Counters With Buffer

We have some input requests into our servers.
During the process of a request, we choose to “paint” it with some data (decided by some logic).
Some requests will be painted by Value-1, some by Value-2, etc. Some will not be painted at all.
We want to limit the number of painted requests (per paint value).
In order to have limit, for each paint-value, we know the maximum, but also need to count (per paint value) the number of painted requests.
As the system has several servers, the counters should be shared by all servers.

The latency is crucial. Normally we get 4-5 milliseconds per request processing (for all the flow. Not just the painting).
So we don’t want that increasing the counters will increase the latency.
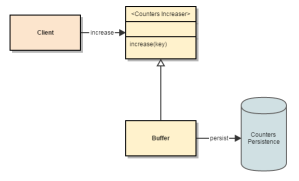
Instead, we’ll keep a buffer, the client will send ‘increase’ to the buffer.
The buffer will periodically increase the repository with “bulk incremental”.

I know it is possible to use directly Hazelcast or Couchbase or some other similar fast in-memory DB.
But for our use-case, that was the best solution.

The principle is simple:

  • The dependent module will call a service to increase a counter for some key
  • The implementation keeps a buffer of counters per key
  • It is thread safe
  • The writing happens in a separate thread
  • Each write will do a bulk increase
Counters High Level Design

Counters High Level Design

Buffer

For the buffer, I used Google Guava cache.

Buffer Structure

private final LoadingCache<Counterable, BufferValue> cache;
...

this.cache = CacheBuilder.newBuilder()
	.maximumSize(bufferConfiguration.getMaximumSize())
	.expireAfterWrite(bufferConfiguration.getExpireAfterWriteInSec(), TimeUnit.SECONDS)
	.expireAfterAccess(bufferConfiguration.getExpireAfterAccessInSec(), TimeUnit.SECONDS)
	.removalListener((notification) -> increaseCounter(notification))
	.build(new BufferValueCacheLoader());
...

(Counterable is described below)

BufferValueCacheLoader implements the interface CacheLoader.
When we call increase (see below), we first get from the cache by key.
If the key does not exist, the loader returns value.

public class BufferValueCacheLoader extends CacheLoader<Counterable, BufferValue> {
	@Override
	public BufferValue load(Counterable key) {
		return new BufferValue();
	}
}

BufferValue wraps an AtomicInteger (I would need to change it to Long at some point)

Increase the Counter

public void increase(Counterable key) {
	BufferValue meter = cache.getUnchecked(key);
	int currentValue = meter.increment();
	if (currentValue > threashold) {
		if (meter.compareAndSet(currentValue, currentValue - threashold)) {
			increaseCounter(key, threashold);
		}
	}
}

When increasing a counter, we first get current value from cache (with the help of the loader. As descried above).
The compareAndSet will atomically check if has same value (not modified by another thread).
If so, it will update the value and return true.
If success (returned true), the the buffer calls the updater.

View the buffer

After developing the service, I wanted a way to view the buffer.
So I implemented the following method, which is used by the front-end layer (Dropwizard’s resource).
Small example of Java 8 Stream and Lambda expression.

return ImmutableMap.copyOf(cache.asMap())
	.entrySet().stream()
	.collect(
		Collectors.toMap((entry) -> entry.getKey().toString(),
		(entry) -> entry.getValue().getValue()));

MongoDB

I chose MongoDB because of two reasons:

  1. We have similar implementation in our system, which we decided to use MongoDB there as well.
  2. Easy to use with embedded server.

I tried to design the system so it’s possible to choose any other persist implementation and change it.

I used morphia as the MongoDB client layer instead of using directly the Java client.
With Morphia you create a dao, which is the connection to a MongoDB collection.
You also declare a simple Java Bean (POJO), that represent a document in a collection.
Once you have the dao, you can do operations on the collection the “Java way”, with fairly easy API.
You can have queries and any other CRUD operations, and more.

I had two operations: increasing counter and getting all counters.
The services implementations do not extend Morphia’s BasicDAO, but instead have a class that inherits it.
I used composition (over inheritance) because I wanted to have more behavior for both services.

In order to be consistent with the key representation, and to hide the way it is implemented from the dependent code, I used an interface: Counterable with a single method: counterKey().

public interface Counterable {
	String counterKey();
}
final class MongoCountersDao extends BasicDAO<Counter, ObjectId> {
	MongoCountersDao(Datastore ds) {
		super(Counter.class, ds);
	}
}

Increasing the Counter

@Override
protected void increaseCounter(String key, int value) {
	Query<Counter> query = dao.createQuery();
	query.criteria("id").equal(key);
	UpdateOperations<Counter> ops = dao.getDs().createUpdateOperations(Counter.class).inc("count", value);
	dao.getDs().update(query, ops, true);
}

Embedded MongoDB

In order to run tests on the persistence layer, I wanted to use an in-memory database.
There’s a MongoDB plugin for that.
With this plugin you can run a server by just creating it on runtime, or run as goal in maven / task in Gradle.
https://github.com/flapdoodle-oss/de.flapdoodle.embed.mongo
https://github.com/sourcemuse/GradleMongoPlugin

Embedded MongoDB on Gradle

I will elaborate more on Gradle later, but here’s what I needed to do in order to set the embedded mongo.

dependencies {
	// More dependencies here
	testCompile 'com.sourcemuse.gradle.plugin:gradle-mongo-plugin:0.4.0'
}

Setup Properties

mongo {
	//	logFilePath: The desired log file path (defaults to 'embedded-mongo.log')
	logging 'console'
	mongoVersion 'PRODUCTION'
	port 12345
	//	storageLocation: The directory location from where embedded Mongo will run, such as /tmp/storage (defaults to a java temp directory)
}

Embedded MongoDB Gradle Tasks

startMongoDb will just start the server. It will run until stopping it.
stopMongoDb will stop it.
startManagedMongoDb test , two tasks, which will start the embedded server before the tests run. The server will shut down when the jvm finishes (the tests finish)

Gradle

https://gradle.org/
Although I only touch the tip of the iceberg, I started seeing the strength of Gradle.
It wasn’t even that hard setting up the project.

Gradle Setup

First, I created a Gradle project in eclipse (after installing the plugin).
I needed to setup the dependencies. Very simple. Just like maven.

One Big JAR Output

When I want to create one big jar from all libraries in Maven, I use the shade plugin.
I was looking for something similar, and found gradle-one-jar pluging.
https://github.com/rholder/gradle-one-jar
I added that plugin
apply plugin: 'gradle-one-jar'
Added one-jar to classpath:

buildscript {
	repositories { mavenCentral() }
	dependencies {
		classpath 'com.sourcemuse.gradle.plugin:gradle-mongo-plugin:0.4.0'
		classpath 'com.github.rholder:gradle-one-jar:1.0.4'
	}
}

And added a task:

mainClassName = 'org.eyalgo.server.dropwizard.CountersBufferApplication'
task oneJar(type: OneJar) {
	mainClass = mainClassName
	archiveName = 'counters.jar'
	mergeManifestFromJar = true
}

Those were the necessary actions I needed to do in order to make the application run.

Dropwizard

Dropwizard is a stack of libraries that makes it easy to create web servers quickly.
It uses Jetty for HTTP and Jersey for REST. It has other mature libraries to create complicated services.
It can be used as an easy developed microservice.

As I explained in the introduction, I will not cover all of Dropwizard features and/or setup.
There are plenty of sites for that.
I will briefly cover the actions I did in order to make the application run.

Gradle Run Task

run { args 'server', './src/main/resources/config/counters.yml' }
First argument is server. Second argument is the location of the configuration file.
If you don’t give Dropwizard the first argument, you will get a nice error message of the possible options.

positional arguments:
  {server,check}         available commands

I already showed how to create one jar in the Gradle section.

Configuration

In Dropwizard, you setup the application using a class that extends Configuration.
The fields in the class should align to the properties in the yml configuration file.

It is a good practice to put the properties in groups, based on their usage/responsibility.
For example, I created a group for mongo parameters.

In order for the configuration class to read the sub groups correctly, you need to create a class that align to the properties in the group.
Then, in the main configuration, add this class as a member and mark it with annotation: @JsonProperty.
Example:

@JsonProperty("mongo")
private MongoServicesFactory servicesFactory = new MongoServicesFactory();
@JsonProperty("buffer")
private BufferConfiguration bufferConfiguration = new BufferConfiguration();

Example: Changing the Ports

Here’s part of the configuration file that sets the ports for the application.

server:
  adminMinThreads: 1
  adminMaxThreads: 64
  applicationConnectors:
    - type: http
      port: 9090
  adminConnectors:
    - type: http
      port: 9091

Health Check

Dropwizard gives basic admin API out of the box. I changed the port to 9091.
I created a health check for MongoDB connection.
You need to extend HealthCheck and implement check method.

private final MongoClient mongo;
...
protected Result check() throws Exception {
	try {
		mongo.getDatabaseNames();
		return Result.healthy();
	} catch (Exception e) {
		return Result.unhealthy("Cannot connect to " + mongo.getAllAddress());
	}
}

Other feature are pretty much self-explanatory or simple as any getting started tutorial.

Ideas for Enhancement

The are some things I may try to add.

  • Add tests to the Dropwizard section.
    This project started as PoC, so I, unlike usually, skipped the tests in the server part.
    Dropwizard has Testing Dropwizard, which I want to try.
  • Different persistence implementation. (couchbase? Hazelcast?).
  • Injection using Google Guice. And with help of that, inject different persistence implementation.

That’s all.
Hope that helps.

Source code: https://github.com/eyalgo/CountersBuffering

Linkedin Twitter facebook github

Java 8 Stream and Lambda Expressions – Parsing File Example

Recently I wanted to extract certain data from an output log.
Here’s part of the log file:

2015-01-06 11:33:03 b.s.d.task [INFO] Emitting: eVentToRequestsBolt __ack_ack [-6722594615019711369 -1335723027906100557]
2015-01-06 11:33:03 c.s.p.d.PackagesProvider [INFO] ===---> Loaded package com.foo.bar
2015-01-06 11:33:04 b.s.d.executor [INFO] Processing received message source: eventToManageBolt:2, stream: __ack_ack, id: {}, [-6722594615019711369 -1335723027906100557]
2015-01-06 11:33:04 c.s.p.d.PackagesProvider [INFO] ===---> Loaded package co.il.boo
2015-01-06 11:33:04 c.s.p.d.PackagesProvider [INFO] ===---> Loaded package dot.org.biz

I decided to do it using the Java8 Stream and Lambda Expression features.

Read the file
First, I needed to read the log file and put the lines in a Stream:

Stream<String> lines = Files.lines(Paths.get(args[1]));

Filter relevant lines
I needed to get the packages names and write them into another file.
Not all lines contained the data I need, hence filter only relevant ones.

lines.filter(line -> line.contains("===---> Loaded package"))

Parsing the relevant lines
Then, I needed to parse the relevant lines.
I did it by first splitting each line to an array of Strings and then taking the last element in that array.
In other words, I did a double mapping. First a line to an array and then an array to a String.

.map(line -> line.split(" "))
.map(arr -> arr[arr.length - 1])

Writing to output file
The last part was taking each string and write it to a file. That was the terminal operation.

.forEach(packageName -> writeToFile(fw, packageName));

writeToFile is a method I created.
The reason is that Java File System throws IOException. You can’t use checked exceptions in lambda expressions.

Here’s a full example (note, I don’t check input)

import java.io.FileWriter;
import java.io.IOException;
import java.nio.file.Files;
import java.nio.file.Paths;
import java.util.Arrays;
import java.util.List;
import java.util.stream.Stream;

public class App {
	public static void main(String[] args) throws IOException {
		Stream<String> lines = null;
		if (args.length == 2) {
			lines = Files.lines(Paths.get(args[1]));
		} else {
			String s1 = "2015-01-06 11:33:03 b.s.d.task [INFO] Emitting: adEventToRequestsBolt __ack_ack [-6722594615019711369 -1335723027906100557]";
			String s2 = "2015-01-06 11:33:03 b.s.d.executor [INFO] Processing received message source: eventToManageBolt:2, stream: __ack_ack, id: {}, [-6722594615019711369 -1335723027906100557]";
			String s3 = "2015-01-06 11:33:04 c.s.p.d.PackagesProvider [INFO] ===---> Loaded package com.foo.bar";
			String s4 = "2015-01-06 11:33:04 c.s.p.d.PackagesProvider [INFO] ===---> Loaded package co.il.boo";
			String s5 = "2015-01-06 11:33:04 c.s.p.d.PackagesProvider [INFO] ===---> Loaded package dot.org.biz";
			List<String> rows = Arrays.asList(s1, s2, s3, s4, s5);
			lines = rows.stream();
		}
		
		new App().parse(lines, args[0]);

	}
	
	private void parse(Stream<String> lines, String output) throws IOException {
		final FileWriter fw = new FileWriter(output);
		
		//@formatter:off
		lines.filter(line -> line.contains("===---> Loaded package"))
		.map(line -> line.split(" "))
		.map(arr -> arr[arr.length - 1])
		.forEach(packageName-> writeToFile(fw, packageName));
		//@formatter:on
		fw.close();
		lines.close();
	}

	private void writeToFile(FileWriter fw, String packageName) {
		try {
			fw.write(String.format("%s%n", packageName));
		} catch (IOException e) {
			throw new RuntimeException(e);
		}
	}

}

(You can find more Java 8 features tutorial at: Java Code Geek – Java 8 Features Tutorial )
Linkedin Twitter facebook github

Working With Legacy Code, What does it Really Mean

At the end of January I am going to talk in Agile Practitioners 2015 TLV.
I’ll be talking about Legacy Code and how to approach it.

As the convention’s name implies, we’re talking practical stuff.

So what is practical in working with legacy code?
Is it how to extract a method? Or maybe it’s how to introduce setter for a static singleton?
Break dependency?
There are so many actions to make while working on legacy code.

But I want to stop for a minute and think.
What does it mean to work on legacy code?
How do we want the code to be after the changes?
Why do we need to change it? Do we really need to change it?

Definition
Let’s start with the definition of Legacy Code.
If you search the web you will see definitions such as “…Legacy code refers to an application system source code type that is no longer supported…” (from: techopedia)

People may think that legacy code is old, patched.

The definitions above are correct (old, patched, un-maintained, etc.), but I think that the definition coined by Michael Feathers (Working Effectively with Legacy Code) is better.
He defined legacy code as

Code Without Tests

I like to add that legacy code is usually Code that cannot be tested.
So basically, if 10 minutes ago, I wrote code which is not tested, and not testable, then it’s already Legacy Code.

Questioning the Code
When approaching code (any code), I think we should ask ourselves the following questions constantly.

  • What’s wrong with this code?
  • How do we want the code to be?
  • How can I test this piece of code?
  • What should I test?
  • Am I afraid to change this part of code?

Why Testable Code?
Why do we want to test our code?

Tests are the harness of the code.
It’s the safety net.

Imagine a circus show with trapeze. There’s a safety net below (or mattress)
The athletes can perform, knowing that nothing harmful will happen if they fall (well, maybe their pride).

Recently I went to an indie circus show.
The band was playing and a girl came to do some tricks on a high rope.
But before she even started, she fixed a mattress below.

And this is what working with legacy code is all about:
Put a mattress before you start doing tricks…
Or, in our words, add tests before you work / change the legacy code.

Think about it, the list of questions above can be answered (or thought of) just by understanding that we need to write tests to our code.
Once you put your safety net, your’re not afraid to jump.
⇒ once you write tests, you can add feature, fix bug, refactor.

Conclusion
In this post I summarized what does it mean to work with legacy code.
It’s simple:
working with legacy code, is knowing how to write tests to untested code.

The crucial thing is, understanding that we need to do that. Understanding that we need to invest the time to write those tests.
I think that this is as important as knowing the techniques themselves.

In following post(s) I will give some techniques examples.

A girl is doing trapeze with a mattress below

A girl is doing trapeze with a mattress below

Linkedin Twitter facebook github

Playing With Java Concurrency

Recently I needed to transform some filet that each has a list (array) of objects in JSON format to files that each has separated lines of the same data (objects).

It was a one time task and simple one.
I did the reading and writing using some feature of Java nio.
I used GSON in the simplest way.
One thread runs over the files, converts and writes.

The whole operation finished in a few seconds.

However, I wanted to play a little bit with concurrency.
So I enhanced the tool to work concurrently:

Threads
Runnable for reading file.
The reader threads are submitted to ExecutorService.
The output, which is a list of objects (User in the example), will be put in a BlockingQueue.

Runnable for writing file.
Each runnable will poll from the blocking queue.
It will write lines of data to a file.
I don’t add the writer Runnable to the ExecutorService, but instead just start a thread with it.
The runnable has a while(some boolen is true) {...} pattern.
More about that below…

Synchronizing Everything
BlockingQueue is the interface of both types of threads.

As the writer runnable runs in a while loop (consumer), I wanted to be able to make it stop so the tool will terminate.
So I used two objects for that:

Semaphore
The loop that reads the input files increments a counter.
Once I finished traversing the input files and submitted the writers, I initialized a semaphore in the main thread:
semaphore.acquire(numberOfFiles);

In each reader runable, I released the semaphore:
semaphore.release();

AtomicBoolean
The while loop of the writers uses an AtomicBoolean.
As long as AtomicBoolean==true, the writer will continue.

In the main thread, just after the acquire of the semaphore, I set the AtomicBoolean to false.
This enables the writer threads to terminate.

Using Java NIO
In order to scan, read and write the file system, I used some features of Java NIO.

Scanning: Files.newDirectoryStream(inputFilesDirectory, "*.json");
Deleting output directory before starting: Files.walkFileTree...
BufferedReader and BufferedWriter: Files.newBufferedReader(filePath); Files.newBufferedWriter(fileOutputPath, Charset.defaultCharset());

One note. In order to generate random files for this example, I used apache commons lang: RandomStringUtils.randomAlphabetic
All code in GitHub.

public class JsonArrayToJsonLines {
	private final static Path inputFilesDirectory = Paths.get("src\\main\\resources\\files");
	private final static Path outputDirectory = Paths
			.get("src\\main\\resources\\files\\output");
	private final static Gson gson = new Gson();
	
	private final BlockingQueue<EntitiesData> entitiesQueue = new LinkedBlockingQueue<>();
	
	private AtomicBoolean stillWorking = new AtomicBoolean(true);
	private Semaphore semaphore = new Semaphore(0);
	int numberOfFiles = 0;

	private JsonArrayToJsonLines() {
	}

	public static void main(String[] args) throws IOException, InterruptedException {
		new JsonArrayToJsonLines().process();
	}

	private void process() throws IOException, InterruptedException {
		deleteFilesInOutputDir();
		final ExecutorService executorService = createExecutorService();
		DirectoryStream<Path> directoryStream = Files.newDirectoryStream(inputFilesDirectory, "*.json");
		
		for (int i = 0; i < 2; i++) {
			new Thread(new JsonElementsFileWriter(stillWorking, semaphore, entitiesQueue)).start();
		}

		directoryStream.forEach(new Consumer<Path>() {
			@Override
			public void accept(Path filePath) {
				numberOfFiles++;
				executorService.submit(new OriginalFileReader(filePath, entitiesQueue));
			}
		});
		
		semaphore.acquire(numberOfFiles);
		stillWorking.set(false);
		shutDownExecutor(executorService);
	}

	private void deleteFilesInOutputDir() throws IOException {
		Files.walkFileTree(outputDirectory, new SimpleFileVisitor<Path>() {
			@Override
			public FileVisitResult visitFile(Path file, BasicFileAttributes attrs) throws IOException {
				Files.delete(file);
				return FileVisitResult.CONTINUE;
			}
		});
	}

	private ExecutorService createExecutorService() {
		int numberOfCpus = Runtime.getRuntime().availableProcessors();
		return Executors.newFixedThreadPool(numberOfCpus);
	}

	private void shutDownExecutor(final ExecutorService executorService) {
		executorService.shutdown();
		try {
			if (!executorService.awaitTermination(120, TimeUnit.SECONDS)) {
				executorService.shutdownNow();
			}

			if (!executorService.awaitTermination(120, TimeUnit.SECONDS)) {
			}
		} catch (InterruptedException ex) {
			executorService.shutdownNow();
			Thread.currentThread().interrupt();
		}
	}


	private static final class OriginalFileReader implements Runnable {
		private final Path filePath;
		private final BlockingQueue<EntitiesData> entitiesQueue;

		private OriginalFileReader(Path filePath, BlockingQueue<EntitiesData> entitiesQueue) {
			this.filePath = filePath;
			this.entitiesQueue = entitiesQueue;
		}

		@Override
		public void run() {
			Path fileName = filePath.getFileName();
			try {
				BufferedReader br = Files.newBufferedReader(filePath);
				User[] entities = gson.fromJson(br, User[].class);
				System.out.println("---> " + fileName);
				entitiesQueue.put(new EntitiesData(fileName.toString(), entities));
			} catch (IOException | InterruptedException e) {
				throw new RuntimeException(filePath.toString(), e);
			}
		}
	}

	private static final class JsonElementsFileWriter implements Runnable {
		private final BlockingQueue<EntitiesData> entitiesQueue;
		private final AtomicBoolean stillWorking;
		private final Semaphore semaphore;

		private JsonElementsFileWriter(AtomicBoolean stillWorking, Semaphore semaphore,
				BlockingQueue<EntitiesData> entitiesQueue) {
			this.stillWorking = stillWorking;
			this.semaphore = semaphore;
			this.entitiesQueue = entitiesQueue;
		}

		@Override
		public void run() {
			while (stillWorking.get()) {
				try {
					EntitiesData data = entitiesQueue.poll(100, TimeUnit.MILLISECONDS);
					if (data != null) {
						try {
							String fileOutput = outputDirectory.toString() + File.separator + data.fileName;
							Path fileOutputPath = Paths.get(fileOutput);
							BufferedWriter writer = Files.newBufferedWriter(fileOutputPath, Charset.defaultCharset());
							for (User user : data.entities) {
								writer.append(gson.toJson(user));
								writer.newLine();
							}
							writer.flush();
							System.out.println("=======================================>>>>> " + data.fileName);
						} catch (IOException e) {
							throw new RuntimeException(data.fileName, e);
						} finally {
							semaphore.release();
						}
					}
				} catch (InterruptedException e1) {
				}
			}
		}
	}

	private static final class EntitiesData {
		private final String fileName;
		private final User[] entities;

		private EntitiesData(String fileName, User[] entities) {
			this.fileName = fileName;
			this.entities = entities;
		}
	}
}

Linkedin Twitter facebook github

It’s All About Tests – Part 3

In the previous two posts I discussed mostly about the philosophy and attitude of developing with testing.
In this post I give some tips and tools examples for testing.

Tools

JUnit
http://junit.org/
There’s also TestNG, which is great tool. But I have much more experience with JUnit so I will describe this framework.
1. Use the latest version.
2. Know your testing tool!

  • @RunWith
    This is class annotation. It tells JUnit to run with different Runner (mockito and Spring runners are the most common runners I use)

    import org.mockito.runners.MockitoJUnitRunner;
    ...
    @RunWith(MockitoJUnitRunner.class)
    public class MyClassTest {
      ...
    }
    
    @RunWith(SpringJUnit4ClassRunner.class)
    @ContextConfiguration(locations = { "/META-INF/app-context.xml","classpath:anotherContext.xml" })
    public class MyClassTest {
      ...
    }
    // You can inherit AbstractJUnit4SpringContextTests instead of using runner
    
  • @Rule
    kind of AOP.
    The most common out-of-the-box rule, is the TemporaryFolder Rule. It lets you use the file system without worrying about opening and closing files.
    An example of Rules can be found here.
  • Parameterized runner
    Really cool tool. It lets you run the same test with different input and different expected output.
    It might be abused and make a atest unreadable.
  • Test Data Preparation and Maintenance Tips

hamcrest
http://hamcrest.org/JavaHamcrest/
This library is “extension” of JUnit.
I can’t work without it 🙂
Hamcrest library gives us out-of-the-box matchers.
Matchers are used with the assertThat(...,Matcher) flavor.
I almost always use this flavor.
(In the previous post, someone suggested that I shouldn’t use assertTrue(…), but instead use assertThat.)

There are plenty type of matchers:
You can verify existing objects in collection ignoring order.
You can check greater than.
The test is more readable using the assertThat + matcher.

assertThat(mapAsCache.containsKey(new CacheKey("valA", "valB")), is(true));
assertThat(cachPairs.size(), is(2));
assertThat(enity.getSomething(), nullValue(Double.class));
assertThat(event.getType(), equalTo(Type.SHOWN));
assertThat(bits, containsInAnyOrder(longsFromUsIndexOne, longsFromUsIndexZero));

You can create your own Matcher. It’s very easy.
Here’s an example of matchers that verify Regular Expressions. https://github.com/eyalgo/junit-additions

mockito
https://code.google.com/p/mockito/
This is the second library I can’t work without.
It lets you mock dependencies of the class under test.

Using mockito you mock dependency.
Then you “tell” the mock object how to behave in certain inputs.
You tell it what to return if some input entered.
You can verify input arguments to a called method.
You can verify that a certain method was called (once, never, 3 times, etc.)
You can check the order of method / mocks calls.

Check this out:

package eyalgo;
import static org.hamcrest.Matchers.equalTo;
import static org.mockito.Matchers.anyString;
import static org.mockito.Matchers.argThat;
import static org.mockito.Mockito.inOrder;
import static org.mockito.Mockito.mock;
import static org.mockito.Mockito.never;
import static org.mockito.Mockito.times;
import static org.mockito.Mockito.verify;
import static org.mockito.Mockito.verifyNoMoreInteractions;
import static org.mockito.Mockito.verifyZeroInteractions;
import static org.mockito.Mockito.when;
import org.junit.Before;
import org.junit.Test;
import org.junit.runner.RunWith;
import org.mockito.InOrder;
import org.mockito.InjectMocks;
import org.mockito.Mock;
import org.mockito.MockitoAnnotations;
import org.mockito.invocation.InvocationOnMock;
import org.mockito.runners.MockitoJUnitRunner;
import org.mockito.stubbing.Answer;
//The RunWith automatically instantiate fields with @Mock annotation
//and injects to the tested class @InjectMocks
@RunWith(MockitoJUnitRunner.class)
public class NameConnectorTest {
@Mock
private NameConvention nameConventionAsMockField;
@InjectMocks
private NameConnector connector;
private NameConvention nameConventionAsMockOther;
@Before
public void setup() {
//This is another way to inject mocks (instead of the annotations above)
MockitoAnnotations.initMocks(this);
nameConventionAsMockOther = mock(NameConvention.class);
NameConnector otherConnector = new NameConnector(nameConventionAsMockOther);
}
@Test
public void showSomeMockitoExamples() {
NameConvention nameConventionAsMock = mock(NameConvention.class, "Name for this mock");
// Stub and tell your mock to do something
when(nameConventionAsMock.bigBangConvention("INPUT")).thenReturn("Some output");
// Throw exception for some input
when(nameConventionAsMock.bigBangConvention("Other INPUT")).thenThrow(new RuntimeException("oops"));
// Do more complicated stuff in the "when"
Answer<String> answer = new Answer<String>() {
@Override
public String answer(InvocationOnMock invocation) throws Throwable {
//do something really complicated
return "some output";
}
};
//Show also hamcrest matchers
when(nameConventionAsMock.bigBangConvention(argThat(equalTo("my name is Inigo Montoya")))).then(answer);
// Run the test..
//Verify some calls
verify(nameConventionAsMock).bigBangConvention("INPUT");
verify(nameConventionAsMock, times(10)).bigBangConvention("wow");
// Verify that the method was never called. With any input
verify(nameConventionAsMock, never()).bigBangConvention(anyString());
verifyNoMoreInteractions(nameConventionAsMock);
verifyZeroInteractions(nameConventionAsMockField);
//Check order of calls
InOrder order = inOrder(nameConventionAsMock, nameConventionAsMockOther);
order.verify(nameConventionAsMock).bigBangConvention("INPUT");
order.verify(nameConventionAsMock).bigBangConvention("other INPUT");
}
}

Other Mocking Tools

  • PowerMock and EasyMock
    These two are very useful when working with legacy code.
    They allow you to test private methods, static methods and more things that you normally can’t.
    I think that if you need them, then something is wrong with the design.
    However, sometimes you use external libraries with singletons and/or static methods.
    Sometimes you work on legacy code, which is not well suited for testing.
    On these types of scenarios, then those mocking libraries can help
    https://code.google.com/p/powermock/
    http://easymock.org/
  • JMockit http://jmockit.github.io/
  • jMock http://jmock.org/

JBehave
http://jbehave.org/
JUnit, mockito, hamcrest are used for unit tests.
JBehave is not exactly the same.
It is a tool for Behavior-Driven-Development (BDD)
You write stories which are backed up by code (Java) and then you run them.

JBehave can be used for higher level tests, like functional tests.
Using JBehave, it’s easier to test a flow in the system.
It follows the Given, When, Then sequence.

If you take it to the next step, it can be a great tool for communication.
The product owner can write the scenarios, and if all is green, by the end of the iteration, then we passed the definition of done.

cucumber is another BDD tool.

Dependency Injection
In order to have testable code, among other things, you need to practice DI (dependency injection).
The reason is simple:
If you instantiate a dependency in a constructor (or method) of a class under test, then how can you mock it?
If you can’t mock the dependency, then you are bound to it. And you can’t simulate different cases.

Many application have Spring as the DI container, but less developers take the advantage of using the injection for testing.

Metrics
Use SONAR in your CI environment.
Check code coverage using cobertura or other tools.
Use Jenkins / Hudson / Other CI tool for automation.

IDE
Your IDE can help you writing tests.
For eclipse, I have two recommendations:

  1. MoreUnit is cool plugin that helps writing tests faster.
  2. In eclipse, CTRL+Space can give you hints and fill imports. But not static imports.
    Most (all?) libraries use static imports.
    So you can add the testing libraries as favorites and then eclipse will fill them for you.
  3. eclipse favorites

    eclipse favorites

POM
Here’s part of POM for testing libraries.

<build>
<plugins>
<plugin>
<groupId>org.apache.maven.plugins</groupId>
<artifactId>maven-compiler-plugin</artifactId>
<configuration>
<source>1.8</source>
<target>1.8</target>
</configuration>
</plugin>
<plugin>
<groupId>org.apache.maven.plugins</groupId>
<artifactId>maven-jar-plugin</artifactId>
<configuration>
<archive>
<addMavenDescriptor>false</addMavenDescriptor>
</archive>
</configuration>
</plugin>
<plugin>
<groupId>org.apache.maven.plugins</groupId>
<artifactId>maven-source-plugin</artifactId>
<executions>
<execution>
<goals>
<goal>jar-no-fork</goal>
</goals>
</execution>
</executions>
</plugin>
<plugin>
<artifactId>maven-assembly-plugin</artifactId>
<configuration>
<archive>
<manifest>
<mainClass>com.startapp.CouchRunner.GetUserProfile</mainClass>
</manifest>
</archive>
<descriptorRefs>
<descriptorRef>jar-with-dependencies</descriptorRef>
</descriptorRefs>
</configuration>
</plugin>
</plugins>
</build>
view raw pom.xml hosted with ❤ by GitHub

You can use profiles to separate unit testing with integration tests.

Linkedin Twitter facebook github

It’s All About Tests – Part 2

This is the second post of the series about testing.
In the first part I explained about the mindset we need to have while developing with tests. Or, in better words, developing for testable code.
In this part I will cover some techniques for testing approach.
The techniques I will describe can be seen as how to transform the mindset into actions.

Techniques

Types Of Tests
Types of tests are layers of what we test.

The most obvious one is the unit test.
Using JUnit (or TestNG, or any other tool), you will test the behavior of your code.
Each test should check one behavior of the class/method under test.

Another layer of tests, which usually done by developers, is what I like to call integration tests.
This type of test will usually be part of the code (under the test directory).

Integration tests may test several classes together.
They may test partial flow.

I like to test Spring wiring, verifying that the context file is correct. For example, if I have injected list of beans and the order is important.
Testing the wiring can be considered as integration test.
Another example would be checking the integration of a DAO class and the class that uses it. Sometimes there are “surprises” in these parts.

As a higher degree of tests, you will want to test request and response (REST).
If you have GUI, make an automated test suit for that as well.

Automation
Automate your full development cycle.
Use CI service, such as Hudson/Jenkins
Add your JUnit, selenium, JMeter, JBehave to your CI environment.

I suggest the following:
1. CI that checks the SCM for changes and runs whenever there is a change.
2. Nightly (or every few hours). A slower automation test suit that check more stuff, like integration tests.
The nightly can be slower.
If you do continuous deployment, then your setup may be different.

Environment
Have dedicated environment for testing.
DB that can be cleared and refilled.
If you work on REST service, have a server just for your test and automation environment.
If you can, try making it as similar as possible to production environment.

Stub, Mock
There are frameworks for stubbing and mocking.
But first understand what it means.
There’s a slight difference between stubbing and mocking.
Basically they both fake a real object (or interface).
You can tell the fake object to behave as you want in certain input.
You could also verify that it was called with expected parameters.
(more about it in next post)

Usage of External Resources
You can fake DB, or you can use some kind of embedded database.
Embedded database helps you isolate tests that include DB.
Same thing for external services.

Descriptive Tests

  • Add the message parameter.
    assertTrue("Cache pairs is not size 2", cachPairs.size() == 2);
    

    It has at least two benefits:
    1. The test is more readable
    2. When it fails, the message is clearer

    How many times you couldn’t tell what went wrong because there was no message? The failing test was assertTrue(something), Without the message parameter.

  • Name you tests descriptively.
    Don’t be afraid to have test-methods with (very) long name.
    It really helps when the test fails.
    Don’t name a test something like: public void testFlow(){...}
    It doesn’t mean anything.
  • Have naming convention.
    I like to name my tests: public void whenSomeInput_ThenSomeOutput() {...}
    But whatever you like to name your tests, try to follow some convention for all tests.

Test Structure
Try to follow the:
Given, When, Then sequence.
Given is the part where you create the test environment (create embedded DB, set certain values etc.)
It is also the part where you tell your mocks (more about it next post) how to behave.
When is the part where you run the tested code.
Then is where you check the result using assertions.
It’s the part where you verify that methods were called. Or not.

If it’s hard to keep an orderly structure, then consider it as test-smell (see previous post).

Unit Tests Should Run Fast
A unit test of class should run 1-5 seconds. Not more.
You want the quickest feedback whether something failed.
You will also want to run the unit tests as many times as possible.
If a test for one class takes around 30-60 seconds, then usually we won’t run it.

Running a full test suit on all your project should not take more than a few minutes (more than 5 is too much).

Coverage
Tests should coverage all your production code.
Coverage helps spot code which is not tested.
If it’s hard to cover some code, for instance due to many code branches (if-else), then again, you have test smell.
If you practice TDD, then you automatically have very high coverage.

Important: Do not make code coverage as the goal.
Code coverage is a tool. Use it.

TDD
Allow me not to add anything here…

Conclusion
In this post I gave some more ways, more concrete, on how to approach development with tests.
In the following post I will give some pointers and tips on how to work with the available tools.

Linkedin Twitter facebook github

It’s All About Tests – Part 1

This post is the first of a series of three.
1. Mindset of testing
2. Techniques
3. Tools and Tips

The Mindset

Testing code is something that needs to be learned. It takes time to absorb how to do it well.
It’s a craft that one should always practice and improve.

Back in the old days, developers did not test, they checked their code.
Here’s a nice twit about it:

Today we have many tools and techniques to work with.
XUnit frameworks, mock frameworks, UI automation, TDD, XP…

But I believe that testing starts with the mind. State of mind.

Why Testing
Should I really answer that?
Tests are your code harness and security for quality.
Tests tell the story of your code. They prove that something works.
They give immediate feedback if something went wrong.
Working with tests correctly makes you more efficient and effective.
You debug less and probably have less bugs, therefore you have more time to do actual work.
Your design will be better (more about it later) and maintainable.
You feel confident changing your code (refactor). More about it later.
It reduces stress, as you are more confident with your code.

What to Test
I say everything.
Perhaps you will skip the lowest parts of your system. The parts that reads/writes to the file system or the DB or communicate some external service.
But even these parts can be tested. And they should.
In following blogs I will describe some techniques how to do that.

Test even the smallest thing. For example, if you have a DTO and you decide that a certain field will be initialized with some value, then make a test that only instantiate this class and then verify (assert) the expected value.
(and yes, I know, some parts really cannot be tested. but they should remain minimal)

SRP
Single Responsibility Principle
This is how I like to refer to the point that a test needs to check one thing.
If it’s a unit test, then it should test one behavior of your method / class.
Different behavior should be tested in a different test.
If it’s a higher level of test (integration, functional, UI), then the same principle applies.
Test one flow of the system.
Test a click.
Test adding elements to DB correctly, but not deleting in the same test.

Isolation
Isolated test helps us understand exactly what went wrong.
Developing isolated test helps us concentrate on one problem at a time.

One aspect of isolation is related to the SRP. When you test something, isolate the tested code from other part (dependencies).
That way you test only that part of the code.
If the test fails, you know were it was.
If you have many dependencies in the test, it is much harder to understand what the actual cause of failure was.

But isolation means other things as well.
It means that no test would interfere another.
It means that the running order of the tests doesn’t matter.
For a unit test, it means that you don’t need a DB running (or internet connection for that matter).
It means that you can run your tests concurrently without one interfere the other (maven allows exactly this).
If you can’t do it (example: DB issues), then your tests are not isolated.

Test Smells
When the test is too hard to understand / maintain, don’t get mad on it 🙂
Say

thank you very much, my dear test, for helping me improve the code

If it is too complicated to setup environment for the test, then probably the unit being tested has too many dependencies.

If after running a method under test, you need to verify many aspects (verify, assert, etc.), the method probably does too much.
The test can be your best friend for code improvement

Usually a really complicated test code means less structured production code.
I usually see correlation between complicated test and code that doesn’t follow the SRP, or any other DOLID principles.

Testable Code
This is one of my favorites.
Whenever I do code review I ask the other person: “How are you going to test it?”, “How do you know it works?”
Whenever I code, I ask myself the same question. “How can I test this piece of code?”

In my experience, thinking always on how to create testable code, yields much better design.
The code “magically” has more patterns, less duplication, better OOD and behaves SOLIDly.

Forcing yourself to constantly test your code, makes you think.
It helps divide big, complicated problem into many (or few) smaller, more trivial ones.

If your code is testable and tested, you have more confident on it.
Confident on the behavior and confident to change it. Refactor it.

Refactoring
This item can be part of the why.
It can be also part of the techniques.
But I decided to give it special attention.
Refactoring is part of the TDD cycle (but not only).
When you have tests, you can be confident doing refactoring.
I think that you need to “think about refactoring” while developing. Similar to “think how to produce testable code”.
When thinking refactoring, testing comes along.

Refactoring is also state of mind. Ask yourself: “Is the code I produced clean enough? Can I improve it?”
(BTW, know when to stop…)

This was the first post of a series of posts about testing.
The following post will be about some techniques and approaches for testing.

Linkedin Twitter facebook github

Using Groovy for Bash (shell) Operations

Recently I needed to create a groovy script that deletes some directories in a Linux machine.
Here’s why:
1.
We have a server for doing scheduled jobs.
Jobs such as ETL from one DB to another, File to DB etc.
The server activates clients, which are located in the machines we want to have action on them.
Most (almost all) of the jobs are written in groovy scripts.

2.
Part of our CI process is deploying a WAR into a dedicated server.
Then, we have a script that among other things uses soft-link to direct ‘webapps’ to the newly created directory.
This deployment happens once an hour, which fills up the dedicated server quickly.

So I needed to create a script that checks all directories in the correct location and deletes old ones.
I decided to keep the latest 4 directories.
It’s currently a magic number in the script. If I want / need I can make it as an input parameter. But I decided to start simple.

I decided to do it very simple:
1. List all directories with prefix webapp_ in a known location
2. Sort them by time, descending, and run delete on all starting index 4.

def numberOfDirectoriesToKeep = 4
def webappsDir = new File('/usr/local/tomcat/tomcat_aps')
def webDirectories = webappsDir.listFiles().grep(~/.*webapps_.*/)
def numberOfWeappsDirectories = webDirectories.size();

if (numberOfWeappsDirectories >= numberOfDirectoriesToKeep) {
  webDirectories.sort{it.lastModified() }.reverse()[numberOfDirectoriesToKeep..numberOfWeappsDirectories-1].each {
    logger.info("Deleteing ${it}");
    // here we'll delete the file. First try was doing a Java/groovy command of deleting directories
  }
} else {
  logger.info("Too few web directories")
}

It didn’t work.
Files were not deleted.
It happened that the agent runs as a different user than the one that runs tomcat.
The agent did not have permissions to remove the directories.

My solution was to run a shell command with sudo.

I found references at:
http://www.joergm.com/2010/09/executing-shell-commands-in-groovy/
and
http://groovy.codehaus.org/Executing+External+Processes+From+Groovy

To make a long story short, here’s the full script:

import org.slf4j.Logger
import com.my.ProcessingJobResult
def Logger logger = jobLogger
//ProcessingJobResult is proprietary
def ProcessingJobResult result = jobResult
try {
logger.info("Deleting old webapps from CI - START")
def numberOfDirectoriesToKeep = 4 // Can be externalized to input parameter
def webappsDir = new File('/usr/local/tomcat/tomcat_aps')
def webDirectories = webappsDir.listFiles().grep(~/.*webapps_.*/)
def numberOfWeappsDirectories = webDirectories.size();
if (numberOfWeappsDirectories >= numberOfDirectoriesToKeep) {
webDirectories.sort{it.lastModified() }.reverse()[numberOfDirectoriesToKeep..numberOfWeappsDirectories-1].each {
logger.info("Deleteing ${it}");
def deleteCommand = "sudo -u tomcat rm -rf " + it.toString();
deleteCommand.execute();
}
} else {
logger.info("Too few web directories")
}
result.status = Boolean.TRUE
result.resultDescription = "Deleting old webapps from CI ended"
logger.info("Deleting old webapps from CI - DONE")
} catch (Exception e) {
logger.error(e.message, e)
result.status = Boolean.FALSE
result.resultError = e.message
}
return result

BTW,
There’s a minor bug of indexes, which I decided not to fix (now), as we always have more directories.

Linkedin Twitter facebook github

JUnit Rules

Introduction
In this post I would like to show an example of how to use JUnit Rule to make testing easier.

Recently I inherited a rather complex system, which not everything is tested. And even the tested code is complex.
Mostly I see lack of test isolation.
(I will write a different blog about working with Legacy Code).

One of the test (and code) I am fixing actually tests several components together.
It also connect to the DB. It tests some logic and intersection between components.
When the code did not compile in a totally different location, the test could not run because it loaded all Spring context.
The structure was that before testing (any class) all Spring context was initiated.
The tests extend BaseTest, which loads all Spring context.

BaseTest also cleans the DB in the @After method.

Important note: This article is about changing tests, which are not structured entirely correct.
When creating new code and tests they should be isolated, testi one thing etc.
Better tests should use mock DB / dependencies etc.
After I fix the test and refactor, I’ll have confidence making more changes.

Back to our topic…
So, what I got is slow run of the test suit, no isolation and even problem running tests due to unrelated problems.

So I decided separating the context loading with DB connection and both of them from the cleaning up of the database.

Approach
In order to achieve that I did three things:
The first was to change inheritance of the test class.
It stopped inheriting BaseTest.
Instead it inherits AbstractJUnit4SpringContextTests
Now I can create my own context per test and not load everything.

Now I needed two rules, a @ClassRule and @Rule
@ClassRule will be responsible for DB connection
@Rule will cleanup the DB after / before each test

But first, what are JUnit Rules?
A short explanation would be that they provide a possibility to intercept test method, similar to AOP concept.
@Rule allows us to intercept method before and after the actual run of the method.
@ClassRule intercepts test class run.
A very known @Rule is JUnit’s TemporaryFolder.

(Similar to @Before, @After and @BeforeClass).

Creating @Rule
The easy part was to create a Rule that cleanup the DB before and after a test method.
You need to implement TestRule, which has one method: Statement apply(Statement base, Description description);
You can do a-lot with it.
I found out that usually I will have an inner class that extends Statement.
The rule I created did not create the DB connection, but got it in the constructor.

Here’s the full code:

public class DbCleanupRule implements TestRule {
private final DbConnectionManager connection;
public DbCleanupRule(DbConnectionManager connection) {
this.connection = connection;
}
@Override
public Statement apply(Statement base, Description description) {
return new DbCleanupStatement(base, connection);
}
private static final class DbCleanupStatement extends Statement {
private final Statement base;
private final DbConnectionManager connection;
private DbCleanupStatement(Statement base, DbConnectionManager connection) {
this.base = base;
this.connection = connection;
}
@Override
public void evaluate() throws Throwable {
try {
cleanDb();
base.evaluate();
} finally {
cleanDb();
}
}
private void cleanDb() {
connection.doTheCleanup();
}
}
}

Creating @ClassRule
ClassRule is actually also TestRule.
The only difference from Rule is how we use it in our test code.
I’ll show it below.

The challenge in creating this rule was that I wanted to use Spring context to get the correct connection.
Here’s the code:
(ExternalResource is TestRule)

public class DbConnectionRule extends ExternalResource {
private DbConnectionManager connection;
public DbConnectionRule() {
}
@Override
protected void before() throws Throwable {
ClassPathXmlApplicationContext ctx = null;
try {
ctx = new ClassPathXmlApplicationContext("/META-INF/my-db-connection-TEST-ctx.xml");
mongoDb = (DbConnectionManager) ctx.getBean("myDbConnection");
} finally {
if (ctx != null) {
ctx.close();
}
}
}
@Override
protected void after() {
}
public DbConnectionManager getDbConnecttion() {
return connection;
}
}

(Did you see that I could make DbCleanupRule inherit ExternalResource?)

Using it
The last part is how we use the rules.
A @Rule must be public field.
A @ClassRule must be public static field.

And there it is:

@ContextConfiguration(locations = { "/META-INF/one-dao-TEST-ctx.xml", "/META-INF/two-TEST-ctx.xml" })
public class ExampleDaoTest extends AbstractJUnit4SpringContextTests {
@ClassRule
public static DbCleanupRule connectionRule = new DbCleanupRule ();
@Rule
public DbCleanupRule dbCleanupRule = new DbCleanupRule(connectionRule.getDbConnecttion());
@Autowired
private ExampleDao classToTest;
@Test
public void foo() {
}
}

That’s all.
Hope it helps.

Eyal

[Edit]
I got some good remarks from Logan Mzz at DZone: http://java.dzone.com/articles/junit-rules#comment-125673

  1. Link to Junit Rules: https://github.com/junit-team/junit/wiki/Rules
  2. There’s ErrorCollector rule, which avoids annoying test-fail-fix cycles for a single test.
  3. And RuleChain, which described in the comment

Linkedin Twitter facebook github

Parse elasticsearch Results Using Ruby

One of our modules in our project is an elasticsearch cluster.
In order to fine tune the configuration (shards, replicas, mapping, etc.) and the queries, we created a JMeter environment.

I wanted to test a simple query with many different input parameters, which will return results.
I.e. query for documents that exist.

The setup for JMeter is simple.
I created the query I want to check as a POST parameter.
In that query, instead of putting one specific value, which means sending the same values in the query over and over, I used parameter.
I directed JMeter to read from a file (CSV) the parameters.

The next thing was to create that data file.
A file, which consists of rows with real values from the cluster.

For that I used another query, which I ran against the cluster using CURL.
(I am changing some parameters naming)

{
   "fields":[
      "FIELD_1"
   ],
   "size":10000,
   "query":{
      "constant_score":{
         "filter":{
            "bool":{
               "must":[
                  {
                     "term":{
                        "LIVE":true
                     }
                  },
                  {
                     "exists":{
                        "field":"FIELD_1"
                     }
                  }
               ]
            }
         }
      }
   }
}

I piped the result into a file.
Here’s a sample of the file (I changed the names of the index, document type and values for this example):

{
  "took" : 586,
  "timed_out" : false,
  "_shards" : {
    "total" : 5,
    "successful" : 5,
    "failed" : 0
  },
  "hits" : {
    "total" : 63807792,
    "max_score" : 1.0,
    "hits" : [ {
      "_index" : "my_index",
      "_type" : "the_document",
      "_id" : "1111111",
      "_score" : 1.0,
      "fields" : {
        "FIELD_1" : "123"
      }
    }, {
      "_index" : "my_index",
      "_type" : "the_document",
      "_id" : "22222222",
      "_score" : 1.0,
      "fields" : {
        "FIELD_1" : "12345"
      }
    }, {
      "_index" : "my_index",
      "_type" : "the_document",
      "_id" : "33333333",
      "_score" : 1.0,
      "fields" : {
        "FIELD_1" : "4456"
      }
    } ]
  }
}

The next thing was parsing this json file, taking only FIELD_1 and put the value in a new file.
For that I used Ruby:

#!/usr/bin/ruby

require 'rubygems'
require 'json'
require 'pp'

input_file = ARGV[0]
output_file = ARGV[1]

json = File.read(input_file)
obj = JSON.parse(json)
hits = obj['hits']

actual_hits = hits['hits']
begin
  file = File.open(output_file, "w")
  actual_hits.each do |hit|
    fields = hit['fields']
    field1 = fields['FIELD_1']
    file.puts(field1)
  end
rescue IOError => e
  # there was an error
ensure
  file.close unless file == nil
end

Important note:
There’s a shorter, better, way to write to file in Ruby:

File.write(output_file, field1)

Unfortunately I can’t use it, as I have older Ruby version and I can’t upgrade it in our sandbox environment.

Linkedin Twitter facebook github

RSS Reader Using: ROME, Spring MVC, Embedded Jetty

In this post I will show some guidlines to create a Spring web application, running it using Jetty and using an external library called ROME for RSS reading.

General

I have recently created a sample web application that acts as an RSS reader.
I wanted to examine ROME for RSS reading.
I also wanted to create the application using Spring container and MVC for the simplest view.
For rapid development, I used Jetty as the server, using a simple java class for it.
All the code can be found at GitHub, eyalgo/rss-reader.

Content

  1. Maven Dependencies
  2. Jetty Server
  3. Spring Dependency
  4. Spring MVC
  5. ROME

Maven Dependencies

At first, I could not get the correct Jetty version to use.
There is one with group-id mortby, and another by eclipse.
After some careful examination and trial and error, I took the eclipse’s library.
Spring is just standard.
I found ROME with newest version under GutHub. It’s still a SNAPSHOT.

Here’s the list of the dependencies:

  • Spring
  • jetty
  • rome and rome-fetcher
  • logback and slf4j
  • For Testing
    • Junit
    • mockito
    • hamcrest
    • spring-test

The project’s pom file can be found at: https://github.com/eyalgo/rss-reader/blob/master/pom.xml

Jetty Server

A few years ago I’ve been working using Wicket framework and got to know Jetty, and its easy usage for creating a server.
I decided to go in that direction and to skip the standard web server running with WAR deployment.

There are several ways to create the Jetty server.
I decided to create the server, using a web application context.

First, create the context:

private WebAppContext createContext() {
  WebAppContext webAppContext = new WebAppContext();
  webAppContext.setContextPath("/");
  webAppContext.setWar(WEB_APP_ROOT);
  return webAppContext;
}

Then, create the server and add the context as handler:

  Server server = new Server(port);
  server.setHandler(webAppContext);

Finally, start the server:

  try {
    server.start();
  } catch (Exception e) {
    LOGGER.error("Failed to start server", e);
    throw new RuntimeException();
  }

Everything is under https://github.com/eyalgo/rss-reader/tree/master/src/test/java/com/eyalgo/rssreader/server

Spring Project Structure

RSS Reader Project Structure

RSS Reader Project Structure

Spring Dependency

In web.xml I am declaring application-context.xml and web-context.xml .
In web-context.xml , I am telling Spring were to scan for components:
<context:component-scan base-package="com.eyalgo.rssreader"/>
In application-context.xml I am adding a bean, which is an external class and therefore I can’t scan it (use annotations):
<bean id="fetcher" class="org.rometools.fetcher.impl.HttpURLFeedFetcher"/>

Besides scanning, I am adding the correct annotation in the correct classes.
@Repository
@Service
@Controller

@Autowired

Spring MVC

In order to have some basic view of the RSS feeds (and atoms), I used a simple MVC and JSP pages.
To create a controller, I needed to add @Controller for the class.
I added @RequestMapping("/rss") so all requests should be prefixed with rss.

Each method has a @RequestMapping declaration. I decided that everything is GET.

Adding a Parameter to the Request

Just add @RequestParam("feedUrl") before the parameter of the method.

Redirecting a Request

After adding an RSS location, I wanted to redirect the answer to show all current RSS items.
So the method for adding an RSS feed needed to return a String.
The returned value is: “redirect:all”.

  @RequestMapping(value = "feed", method = RequestMethod.GET)
  public String addFeed(@RequestParam("feedUrl") String feedUrl) {
    feedReciever.addFeed(feedUrl);
    return "redirect:all";
  }

Return a ModelAndView Class

In Spring MVC, when a method returns a String, the framework looks for a JSP page with that name.
If there is none, then we’ll get an error.
(If you want to return just the String, you can add @ResponseBody to the method.)

In order to use ModelAndView, you need to create one with a name:
ModelAndView modelAndView = new ModelAndView("rssItems");
The name will tell Spring MVC which JSP to refer to.
In this example, it will look for rssItems.jsp.

Then you can add to the ModelAndView “objects”:

  List<FeedItem> items = itemsRetriever.get();
  ModelAndView modelAndView = new ModelAndView("rssItems");
  modelAndView.addObject("items", items);

In the JSP page, you need to refer the names of the objects you added.
And then, you can access their properties.
So in this example, we’ll have the following in rssItems.jsp:

  <c:forEach items="${items}" var="item">
    <div>
      <a href="${item.link}" target="_blank">${item.title}</a><br>
        ${item.publishedDate}
    </div>
  </c:forEach>

Note
Spring “knows” to add jsp as a suffix to the ModelAndView name because I declared it in web-context.xml.
In the bean of class: org.springframework.web.servlet.view.InternalResourceViewResolver.
By setting the prefix this bean also tells Spring were to look for the jsp pages.
Please look:
https://github.com/eyalgo/rss-reader/blob/master/src/main/java/com/eyalgo/rssreader/web/RssController.java
https://github.com/eyalgo/rss-reader/blob/master/src/main/webapp/WEB-INF/views/rssItems.jsp

Error Handling

There are several ways to handle errors in Spring MVC.
I chose a generic way, in which for any error, a general error page will be shown.

First, add @ControllerAdvice to the class you want to handle errors.

Second, create a method per type of exception you want to catch.
You need to annotate the method with @ExceptionHandler. The parameter tells which exception this method will handle.

You can have a method for IllegalArgumentException and another for different exception and so on.

The return value can be anything and it will act as normal controller. That means, having a jsp (for example) with the name of the object the method returns.

In this example, the method catches all exception and activates error.jsp, adding the message to the page.

  @ExceptionHandler(Exception.class)
  public ModelAndView handleAllException(Exception e) {
    ModelAndView model = new ModelAndView("error");
    model.addObject("message", e.getMessage());
    return model;
  }

ROME

ROME is an easy to use library for handling RSS feeds.
https://github.com/rometools/rome
rome-fetcher is an additional library that helps getting (fetching) RSS feeds from external sources, such as HTTP, or URL.
https://github.com/rometools/rome-fetcher

As of now, the latest build is 2.0.0-SNAPSHOT

An example on how to read an input RSS XML file can be found at:
https://github.com/eyalgo/rss-reader/blob/master/src/test/java/com/eyalgo/rssreader/runners/MetadataFeedRunner.java

To make life easier, I used rome-fetcher.
It gives you the ability to give a URL (RSS feed) and have all the SyndFeed out of it.

If you want, you can add caching, so it won’t download cached items (items that were already downloaded).
All you need is to create the fetcher with FeedFetcherCache parameter in the constructor.

Usage:

  @Override
  public List<FeedItem> extractItems(String feedUrl) {
    try {
      List<FeedItem> result = Lists.newLinkedList();
      URL url = new URL(feedUrl);
      SyndFeed feed = fetcher.retrieveFeed(url);
      List<SyndEntry> entries = feed.getEntries();
      for (SyndEntry entry : entries) {
        result.add(new FeedItem(entry.getTitle(), entry.getLink(), entry.getPublishedDate()));
      }
      return result;
    } catch (IllegalArgumentException | IOException | FeedException | FetcherException e) {
      throw new RuntimeException("Error getting feed from " + feedUrl, e);
    }
}

https://github.com/eyalgo/rss-reader/blob/master/src/main/java/com/eyalgo/rssreader/service/rome/RomeItemsExtractor.java

Note
If you get a warning message (looks as System.out) that tells that fetcher.properties is missing, just add an empty file under resources (or in the root of the classpath).

Summary

This post covered several topics.
You can also have a look at the way a lot of the code is tested.
Check Matchers and mocks.

If you have any remarks, please drop a note.

Eyal

Linkedin Twitter facebook github

Seven Databases in Seven Weeks – Hbase Day 2

This post is a recap of the second day of Hbase from the Seven Databases in Seven Weeks book.

Most of the commands and scripts can be found at GitHub:
https://github.com/eyalgo/seven-dbs-in-seven-weeks/tree/master/hbase/day_2

Streaming Script
The first thing in day 2 was to download lots of data (big data) and stream it into Hbase.
There’s a JRuby script, which I had to alter in order for it to work.
https://github.com/eyalgo/seven-dbs-in-seven-weeks/blob/master/hbase/day_2/import_from_wikipedia.rb

After altering it, as the book suggested, I had to add some compression to the column family.
After that, I could run the script:

curl http://dumps.wikimedia.org/enwiki/latest/enwiki-latest-pages-articles.xml.bz2 | bzcat | /opt/hbase/hbase-0.94.18/bin/hbase shell /home/eyalgo/seven-dbs-in-seven-weeks/hbase/day_2/import_from_wikipedia.rb

curl http://dumps.wikimedia.org/enwiktionary/latest/enwiktionary-latest-pages-articles.xml.bz2 | bzcat | /opt/hbase/hbase-0.94.18/bin/hbase shell import_from_wikipedia.rb

This is the output while the script runs

1 10.0G    1  128M    0     0   456k      0  6:23:37  0:04:48  6:18:49  817k19000 records inserted (Serotonin)
  1 10.0G    1  131M    0     0   461k      0  6:19:03  0:04:51  6:14:12  921k19500 records inserted (Serotonin specific reuptake inhibitors)
  1 10.0G    1  135M    0     0   469k      0  6:12:45  0:04:54  6:07:51 1109k20000 records inserted (Tennis court)
  1 10.0G    1  138M    0     0   477k      0  6:06:12  0:04:57  6:01:15 1269k20500 records inserted (Tape drive)

The next part in this chapter talks about regions and some other plumbing stuff.

Build links table
In this part the source is the large Wiki table and the output is ‘links’ table.
Each link has ‘From:’ and ‘To:’
Here’s a link to the altered working script.
https://github.com/eyalgo/seven-dbs-in-seven-weeks/blob/master/hbase/day_2/generate_wiki_links.rb

The rest of the chapter shows how to look at the data, count it and more.

Homework
The main part in the homework, was to create a new table: ‘foods’ that takes data from an XML, which can be downloaded from the US’s health & nutrition site.
This data shows the nutrition facts per type of food.

I decided to create a very simple table. The column family does not have any special options.
I created one column family: facts. Each row data from the XML file will be part of facts.
I also decided that the row’s key would be the Display_Name. After all, it’s much easier to look by key and not by some ID.

create 'foods' , 'facts'

In order to see how I should create the script I looked at two sources:
1. The script that imported data for the Wiki table
2. One element (food) from the XML

Here’s one element:

<Food_Display_Row>
  <Food_Code>12350000</Food_Code>
  <Display_Name>Sour cream dip</Display_Name>
  <Portion_Default>1.00000</Portion_Default>
  <Portion_Amount>.25000</Portion_Amount>
  <Portion_Display_Name>cup </Portion_Display_Name>
  <Factor>.25000</Factor>
  <Increment>.25000</Increment>
  <Multiplier>1.00000</Multiplier>
  <Grains>.04799</Grains>
  <Whole_Grains>.00000</Whole_Grains>
  <Vegetables>.04070</Vegetables>
  <Orange_Vegetables>.00000</Orange_Vegetables>
  <Drkgreen_Vegetables>.00000</Drkgreen_Vegetables>
  <Starchy_vegetables>.00000</Starchy_vegetables>
  <Other_Vegetables>.04070</Other_Vegetables>
  <Fruits>.00000</Fruits>
  <Milk>.00000</Milk>
  <Meats>.00000</Meats>
  <Soy>.00000</Soy>
  <Drybeans_Peas>.00000</Drybeans_Peas>
  <Oils>.00000</Oils>
  <Solid_Fats>105.64850</Solid_Fats>
  <Added_Sugars>1.57001</Added_Sugars>
  <Alcohol>.00000</Alcohol>
  <Calories>133.65000</Calories>
  <Saturated_Fats>7.36898</Saturated_Fats>
</Food_Display_Row>

I created the script by examining the wiki script and one element.
Opening a document is when seeing an open XML element tag: Food_Display_Row
When seeing Food_Display_Row as the close tag, the script creates the document.

include Java
import 'org.apache.hadoop.hbase.client.HTable'
import 'org.apache.hadoop.hbase.client.Put'
import 'org.apache.hadoop.hbase.HBaseConfiguration'
import 'javax.xml.stream.XMLStreamConstants'

def jbytes( *args )
  args.map { |arg| arg.to_s.to_java_bytes }
end

factory = javax.xml.stream.XMLInputFactory.newInstance
reader = factory.createXMLStreamReader(java.lang.System.in)

document = nil
buffer = nil
count = 0

puts( @hbase )
conf = HBaseConfiguration.new
table = HTable.new( conf, "foods" )
table.setAutoFlush( false )

while reader.has_next
  type = reader.next
  
  if type == XMLStreamConstants::START_ELEMENT # (3)
  
    case reader.local_name
    when 'Food_Display_Row' then document = {}
    when /Display_Name|Portion_Default|Portion_Amount|Portion_Display_Name|Factor/ then buffer = []
    when /Increment|Multiplier|Grains|Whole_Grains|Vegetables|Orange_Vegetables/ then buffer = []
    when /Drkgreen_Vegetables|Starchy_vegetables|Other_Vegetables|Fruits|Milk|Meats/ then buffer = []
    when /Drybeans_Peas|Soy|Oils|Solid_Fats|Added_Sugars|Alcohol|Calories|Saturated_Fats/ then buffer = []
    end
    
  elsif type == XMLStreamConstants::CHARACTERS
    buffer << reader.text unless buffer.nil?
    
  elsif type == XMLStreamConstants::END_ELEMENT
    
    case reader.local_name
    when /Display_Name|Portion_Default|Portion_Amount|Portion_Display_Name|Factor/
      document[reader.local_name] = buffer.join
    when /Increment|Multiplier|Grains|Whole_Grains|Vegetables|Orange_Vegetables/
      document[reader.local_name] = buffer.join
    when /Drkgreen_Vegetables|Starchy_vegetables|Other_Vegetables|Fruits|Milk|Meats/
      document[reader.local_name] = buffer.join
    when /Drybeans_Peas|Soy|Oils|Solid_Fats|Added_Sugars|Alcohol|Calories|Saturated_Fats/
      document[reader.local_name] = buffer.join

    when 'Food_Display_Row'
      key = document['Display_Name'].to_java_bytes
      
      p = Put.new( key )
      p.add( *jbytes( "facts", "Display_Name", document['Display_Name'] ) )
      p.add( *jbytes( "facts", "Portion_Default", document['Portion_Default'] ) )
      p.add( *jbytes( "facts", "Portion_Amount", document['Portion_Amount'] ) )
      p.add( *jbytes( "facts", "Portion_Display_Name", document['Portion_Display_Name'] ) )
      p.add( *jbytes( "facts", "Factor", document['Factor'] ) )
      p.add( *jbytes( "facts", "Increment", document['Increment'] ) )
      p.add( *jbytes( "facts", "Multiplier", document['Multiplier'] ) )
      p.add( *jbytes( "facts", "Grains", document['Grains'] ) )
      p.add( *jbytes( "facts", "Whole_Grains", document['Whole_Grains'] ) )
      p.add( *jbytes( "facts", "Vegetables", document['Vegetables'] ) )
      p.add( *jbytes( "facts", "Orange_Vegetables", document['Orange_Vegetables'] ) )
      p.add( *jbytes( "facts", "Drkgreen_Vegetables", document['Drkgreen_Vegetables'] ) )
      p.add( *jbytes( "facts", "Starchy_vegetables", document['Starchy_vegetables'] ) )
      p.add( *jbytes( "facts", "Other_Vegetables", document['Other_Vegetables'] ) )
      p.add( *jbytes( "facts", "Fruits", document['Fruits'] ) )
      p.add( *jbytes( "facts", "Milk", document['Milk'] ) )
      p.add( *jbytes( "facts", "Meats", document['Meats'] ) )
      p.add( *jbytes( "facts", "Drybeans_Peas", document['Drybeans_Peas'] ) )
      p.add( *jbytes( "facts", "Soy", document['Soy'] ) )
      p.add( *jbytes( "facts", "Oils", document['Oils'] ) )
      p.add( *jbytes( "facts", "Solid_Fats", document['Solid_Fats'] ) )
      p.add( *jbytes( "facts", "Added_Sugars", document['Added_Sugars'] ) )
      p.add( *jbytes( "facts", "Alcohol", document['Alcohol'] ) )
      p.add( *jbytes( "facts", "Calories", document['Calories'] ) )
      p.add( *jbytes( "facts", "Saturated_Fats", document['Saturated_Fats'] ) )

      table.put( p )
      
      count += 1
      table.flushCommits() if count % 10 == 0
      if count % 500 == 0
        puts "#{count} records inserted (#{document['Display_Name']})"
      end
    end
  end
end

table.flushCommits()
exit

Following are the shell commands that take the XML file and stream them to Hbase.
The first command runs against the file with the single element.
After I verified the correctness, I ran it against to full file.

curl file:///home/eyalgo/seven-dbs-in-seven-weeks/hbase/day_2/food-display-example.xml | cat | /opt/hbase/hbase-0.94.18/bin/hbase shell /home/eyalgo/seven-dbs-in-seven-weeks/hbase/day_2/import_food_display.rb

curl file:///home/eyalgo/seven-dbs-in-seven-weeks/hbase/day_2/MyFoodapediaData/Food_Display_Table.xml | cat | /opt/hbase/hbase-0.94.18/bin/hbase shell /home/eyalgo/seven-dbs-in-seven-weeks/hbase/day_2/import_food_display.rb

Let’s get some food…

get 'foods' , 'fruit smoothie made with milk'

And the result:

COLUMN CELL
facts:Added_Sugars timestamp=1399932481440, value=82.54236
facts:Alcohol timestamp=1399932481440, value=.00000
facts:Calories timestamp=1399932481440, value=197.96000
facts:Display_Name timestamp=1399932481440, value=fruit smoothie made with milk
facts:Drkgreen_Vegetables timestamp=1399932481440, value=.00000
facts:Drybeans_Peas timestamp=1399932481440, value=.00000
facts:Factor timestamp=1399932481440, value=1.00000
facts:Fruits timestamp=1399932481440, value=.56358
facts:Grains timestamp=1399932481440, value=.00000
facts:Increment timestamp=1399932481440, value=.25000
facts:Meats timestamp=1399932481440, value=.00000
facts:Milk timestamp=1399932481440, value=.22624
facts:Multiplier timestamp=1399932481440, value=.25000
facts:Oils timestamp=1399932481440, value=.00808
facts:Orange_Vegetables timestamp=1399932481440, value=.00000
facts:Other_Vegetables timestamp=1399932481440, value=.00000
facts:Portion_Amount timestamp=1399932481440, value=1.00000
facts:Portion_Default timestamp=1399932481440, value=2.00000
facts:Portion_Display_Name timestamp=1399932481440, value=cup
facts:Saturated_Fats timestamp=1399932481440, value=1.91092
facts:Solid_Fats timestamp=1399932481440, value=24.14304
facts:Soy timestamp=1399932481440, value=.00000
facts:Starchy_vegetables timestamp=1399932481440, value=.00000
facts:Vegetables timestamp=1399932481440, value=.00000
facts:Whole_Grains timestamp=1399932481440, value=.00000

Linkedin Twitter facebook github

GIT Pull Requests Using GitHub

Old Habits

We’ve been working with git for more than a year.
The SCM was migrated from SVN, with all its history.
Our habits were migrated as well.

Our flow is (was) fairly simple:
master branch is were we deploy our code from.
When working on a feature, we create a feature branch. Several people can work on this branch.
Some create private local branch. Some don’t.
Code review is done one-on-one. One member asks another to join and walks through the code.

Introducing Pull Request to the Team

Recently I introduced to the team, with the help of a teammate the Pull Requests concept.
It takes some time to grasp the methodology and see the benefits.
However, I already start seeing improvements in collaboration, code quality and coding behaviors.

Benefits

  1. Better collaboration
    When a person does a change and calls for a pull request, the entire team can see the change.
    Everyone can comment and give remarks.
    Discuss changes before they are merged to the main branch.
  2. Code ownership
    Everyone knows about the change and anyone can check and comment. The result is that each one can “own” the code.
    It helps each team member to participate in coding and reviewing any piece of code.
  3. Branches organization
    There’s extra revision of the code before it is merged.
    Branches can be (IMHO should be) deleted after merging the feature.
    git history (the log) is clearer. (This one is totally dependent on the quality of comments)
  4. Improved code quality
    I see that it improves the code quality even before the code review.
    People don’t want to introduce bad code when knowing that everyone can watch it.
  5. Better code review
    We’ve been doing extensive code review since the beginning of the project.
    However, as I explained above, we did it one-on-one, which usually the writer explained the code to the reviewer.
    In my perspective, by doing that, we miss the advantages of code review. The quality of the code review is decreased when the writer explains the material to the reviewer.
    Using pull request, if the reviewer does not understand something, it means that perhaps the code is not clean enough.
    So more remarks and comments, thus, better code.
  6. Mentoring
    When a senior does code review to a junior, one-on-one, nobody else sees it.
    It’s more difficult for the senior to show case the expectations of how the code should look like and how code review should be performed.
    (there are of course other ways passing it, like code dojos. And, pair-programming, although it’s also one-on-one).
    By commenting review in the pull request, the team can see what’s important and how to review.
    Everyone benefits from review of other team members.
  7. Improved git usage habits
    When someone collaborates with the whole team, he/she will probably write better git comments.
    The commits will be smaller and more frequent, as no one wants to read huge amount of diff rows. So no one wants to “upset” the team.
    Using pull requests forces the usage of branches, which improves git history.

Objections

Others may call this section as disadvantages.
But the way I see it, it’s more of complaints of “why do we need this? we’re good with how things were till now”

  1. I get too many email already
    Well, this is true. Using pull request, we start getting much more emails, which is annoying.
    There’s too much noise. I might not notice important emails.
    The answer for that is simple:
    If you are part of this feature, then this mail is important because it mentions code changes in some parts that you are working on.
    If you want to stop receiving emails for this particular pull request, you can ask to mute it.
    Mute Thread

    Mute Thread

  2. If we start emailing, we’ll stop talking to each other
    I disagree with this statement.
    It will probably reduce the one-on-one review talks. But in my (short) experience, it improved our verbal discussions.
    The verbal discussion come after the reviewer watched the code change. If a reviewer did not understand something, only then she will approach the developer.
    The one-on-one discussions are much more efficient and ‘to the point’.
  3. Ahh ! I need to think on better commit comments. Now I have more to think of
    This is good, isn’t it?
    By using pull requests, each one of the team members need to improve the way comments are written in the commits.
    It will also improve git habits. In terms of smaller commits in shorter time.
  4. It’s harder to understand. I prefer that the other developer will explain to me the intentions
    Don’t we miss important advantages of code review by getting a walk though from the writer?
    I mean, if I need to have explanation of what the code does, then we better fix that code.
    So, if it’s hard to understand, I can write my comments until it improves.

How?

In this section I will explain briefly the way we chose to use pull requests.
The screenshots are taken fron GitHub, although BitBucket supports it as well.

Branching From the “main” Branch

I did not write ‘master’ intentionally.
Let’s say that I work on some feature in a branch called FEATURE_A (for me, this is the main branch).
This branch was created from master.
Let’s say that I need to implement some kind of sub feature in FEATURE_A.
Example (extremely simple): Add toString to class Person.
Then I will create a branch (locally out of FEATURE_A):

# On branch FEATURE_A, after pull from remote do:
# git checkout -b <branch-name-with-good-description>
git checkout -b FEATURE_A_add_toString_Person

# In order to push it to remote (GitHub), run this:
# git push -u origin <branch-name-with-good-description>
git push -u origin FEATURE_A_add_toString_Person
# Pushing the branch can be later

Doing a Pull Request

After some work on the branch, and pushing it to GitHub, I can ask for Pull Request.
There are a few ways doing it.
The one I find “coolest” is using a button/link in GitHub for calling pull request.
When entering GitHub’s repository in the web, it shows a clickable notation for the last branch that I pushed to.
After sending the pull request, all team members will receive an email.
You can also assign a specific person to that pull request if you want him/her do the actual code review.

Compare & Pull Request

Compare & Pull Request


Assign Menu

Assign Menu

Changing the Branch for the diff

By default GitHub will ask to do pull request against master branch.
As explained above, sometimes (usually?) we’ll want to diff/merge against some feature branch and not master.
In the pull request dialog, you can select to which branch you want to compare your working branch.

Edit Diff Branch

Edit Diff Branch

Code Review and Discussion

Any pushed code will be added to the pull request.
Any team member can add comment. You can add at the bottom of the discussion.
And, a really nice option, add comment on specific line of code.

Several Commits in Pull Request

Several Commits in Pull Request

Merging and Deleting the Branch

After the discussion and more push code, everyone is satisfied and the code can be merged.
GitHub will tell you whether your working branch can be merged to the main (diff) branch for that pull request.
Sometimes the branches can’t be automatically merged.
In that case, we’ll do a merge locally, fix conflicts (if any) and then push again.
We try to remember doing it often, so usually GitHub will tell us that the branches can be automatically merged.

Branches can be automatically merged

Branches can be automatically merged


Confirm Merge

Confirm Merge


After the pull request is merged, it is automatically closed.
If you are finished, you can delete the branch.
Post Merge / Closed Screen

Post Merge / Closed Screen

Who’s Responsible?

People asked

  • Who should merge?
  • Who should delete the branch?

We found out that it most sensible that the person who initiated the pull request would merge and delete.
The merge will be only after the reviewer gave the OK.

Helpful git Commands

Here’s a list of helpful git commands we use.

# Automatically merge from one branch (from remote) to another
# On branch BRANCH_A and I want to merge any pushed change from BRANCH_B
git pull origin BRANCH_B

# show branches remotly
git remote show origin

# Verify which local branch, which is set to upstream can be deleted
git remote prune origin --dry-run

# Actual remove all tangled branches
git remote prune origin

# Delete the local branch
git branch -d <branch-name>

Resources

https://help.github.com/articles/using-pull-requests
https://www.atlassian.com/git/workflows#!pull-request

Enjoy…

Linkedin Twitter facebook github

Seven Databases in Seven Weeks – Hbase Day 1

Hbase is a columnar NoSQL database.
The first day of Hbase was short and clear.
Installing it was easy. No issues whatsoever.
The examples simulated some wiki pages with revisions.
It was fairly easy.

Installation
I found a really easy tutorial on how to install Hbase on Fedora:
http://tutorialforlinux.com/2014/03/18/how-to-getting-started-with-apache-hbase-on-fedora-19-20-21-3264bit-linux-easy-guide/

Hbase will usually work on several (many) servers. It is recommended to run it with at least 5 machines.
However, it’s possible to run it on a single machine for POC / learning purposes. I am using an old, weak laptop, and Hbase works just fine.

JRuby Script
Part of the learning consists of understanding JRuby, as some scripts and exercises use it.

To load a JRuby script into the Hbase shell, run something like:
/opt/hbase-latest/bin/hbase org.jruby.Main PATH-TO-SCRIPT

The example script: put_multiple_columns initially didn’t work. I think it’s due to different versions.
In the book’s forum I found a similar question and an answer for that problem:
http://forums.pragprog.com/forums/202/topics/11494

I uploaded the working script to GitHub: GitHub-put_multiple_columns.rb

Day 1 Material
Under GitHub, some links, material and homework answers.
https://github.com/eyalgo/seven-dbs-in-seven-weeks/tree/master/hbase/day_1

Day 1 Homework
The exercise is more of a JRuby / Ruby and less of Hbase.

def put_many( table_name, row, column_values )
  import 'org.apache.hadoop.hbase.client.HTable'
  import 'org.apache.hadoop.hbase.client.Put'
  import 'org.apache.hadoop.hbase.HBaseConfiguration'

  def jbytes( *args )
    args.map { |arg| arg.to_s.to_java_bytes }
  end

  puts( @hbase )
  conf = HBaseConfiguration.new
  table = HTable.new( conf, table_name )
  p = Put.new( *jbytes( row ) )
  
  column_values.each do |key, value|
    (key_family, key_name) = key.split(':')
    key_name ||= ""
    p.add( *jbytes( key_family, key_name, value ))
  end
  
  table.put( p )
end

Day 2, working with big data looks really interesting…

Linkedin Twitter facebook github

Seven Databases in Seven Days – Riak

In this post I am summarizing the three days of Riak, which is the second database in the Seven Databases in Seven Days book.
This post is actually in order for me to remember some tweaks I had to do while reading this chapter as sometimes the book wasn’t entirely correct.

A good blog, which I used a little, can be found at:
http://blog.wakatta.jp/blog/2011/12/09/seven-databases-in-seven-weeks-riak-day-3/
(this link directs to the 3rd Riak’s day)

I have everything pushed to GitHub as raw material:
https://github.com/eyalgo/seven-dbs-in-seven-weeks

Installing
The book recommends to install using the source code itself.
I needed to install Erlang as well.

Besides the information in the book, the following link was mostly helpful:
http://docs.basho.com/riak/latest/ops/building/installing/from-source/

I installed everything under /usr/local/riak/.

Start / Stop / Restart
A nice command line to start/stop/restart all the servers:

# under /usr/local/riak/riak-1.4.8/dev
for node in `ls`; do $node/bin/riak start; done
# change start to restart or stop

Port
The port which was installed in my machine was: 10018 for dev1, 10028 for dev2 etc.
The port is located in app.config file, under the etc folder.

Day 3 Issues
Pre-commit
I kept getting PUT aborted by pre-commit hook message instead of the one described in the book.
I had to add the language (javascript) to the operation:

curl -i -X PUT http://localhost:10018/riak/animals -H "content-type: application/json" -d '{"props":{"precommit":[{"name":"good_score","language":"javascript"}]}}'

(see: http://blog.sacaluta.com/2012/07/riak-precommit-hook-example.html)

Running a solr query
Running the suggested query from the book
( curl http://localhost:10018/solr/animals/select?wt=json&q=nickname:rin%20breed:shepherd&q.op=and)
kept returning 400 – Bad Request.
All I needed to do was to surround the URL with: ‘ (apostrophe).

Inverted Index
Running the link as mentioned in the book gives bad response:

Invalid link walk query submitted. Valid link walk query format is: ...

The correct way, as described in http://docs.basho.com/riak/latest/dev/using/2i/

curl http://localhost:10018/buckets/animals/index/mascot_bin/butler

Conclusion
Riak chapter gives a taste of this database.
It explains more about the “tooling” of it rather than the application of it.
I feel that it didn’t explain too much on why someone would use it instead of something else (let’s wait for Redis).

The book had errors in how to run commands.
I had to find by myself how to fix these problems.
Perhaps it’s because I’m reading eBook (PDF on my computer and mobi on my Kindle), and the hard-copy has less issues.
The good part of this problem, is that I had to drill down and read more online and learn more from those mistakes.

Linkedin Twitter facebook github